welcome to Sawlinux, this is sharing the site of PC

Video Post


stat counters
Follow us on Twitter Subscribe to RSS Subscribe via Email

Sunday, April 18, 2010

Saw Linux  /  11:25 PM  /    /  No comments
ေစာလင္းနက္စ္

Fix Msvcp71.dll And Msvcr71.dll Missing Error In Windows 7

Msvcp71.dll And Msvcr71.dll file မ်ား ပ်က္သြားျပီး ေအာက္ပါပံုအတိုင္း မိမိကြန္ပ်ဴတာ
scream ေပၚမွာ တက္လာတာၾကံဳရပါလိမ့္မယ္။ ဒါမွမဟုတ္ တစ္ခ်ိဳ႕ေဆာ့၀ဲမ်ား keygenမ်ား
install ေမာင္းတဲ့အခါ Msvcp71.dll And Msvcr71.dll ဖိုင္မ်ား ပ်က္သြားသည့္အတြက္
ဆက္ မ Run နိုင္ေတာ့ပဲ ေအာက္ပါပံုမ်ားအတိုင္း warning သတိေပး ၀င္းဒိုးေဘာက္စ္တက္
လာတာမ်ိဳးေပၚလာတတ္ပါတယ္။

ေအာက္ပါနည္းလမ္းအတိုင္းေျဖရွင္းလိုက္ရင္ အားလံုးအဆင္ေျပသြားမွာပါ....

Installation In Windows 7 32-bit OS

If you are using Windows 7 32-bit then you need to put both dll files inside Windows/System32 folder as shown in the screenshot below.


dll files to system 32 windows 7


Installation In Windows 7 64-bit OS

If you are using Windows 7 64-bit then you need to put both dll files inside the Windows/SysWOW64 folder as shown in the screenshot below.


We have put both dll files inside one zip archive, simply extract them and follow the above guidelines to install them.

ေဒါင္းလုဒ္ Msvcp71.dll And Msvcr71.dll
မူရင္းလင့္မွ ေဒါင္းလုဒ္ရယူရန္
Saw Linux  /  11:25 PM  /    /  No comments
ေစာလင္းနက္စ္

Fix Msvcp71.dll And Msvcr71.dll Missing Error In Windows 7

Msvcp71.dll And Msvcr71.dll file မ်ား ပ်က္သြားျပီး ေအာက္ပါပံုအတိုင္း မိမိကြန္ပ်ဴတာ
scream ေပၚမွာ တက္လာတာၾကံဳရပါလိမ့္မယ္။ ဒါမွမဟုတ္ တစ္ခ်ိဳ႕ေဆာ့၀ဲမ်ား keygenမ်ား
install ေမာင္းတဲ့အခါ Msvcp71.dll And Msvcr71.dll ဖိုင္မ်ား ပ်က္သြားသည့္အတြက္
ဆက္ မ Run နိုင္ေတာ့ပဲ ေအာက္ပါပံုမ်ားအတိုင္း warning သတိေပး ၀င္းဒိုးေဘာက္စ္တက္
လာတာမ်ိဳးေပၚလာတတ္ပါတယ္။

ေအာက္ပါနည္းလမ္းအတိုင္းေျဖရွင္းလိုက္ရင္ အားလံုးအဆင္ေျပသြားမွာပါ....

Installation In Windows 7 32-bit OS

If you are using Windows 7 32-bit then you need to put both dll files inside Windows/System32 folder as shown in the screenshot below.


dll files to system 32 windows 7


Installation In Windows 7 64-bit OS

If you are using Windows 7 64-bit then you need to put both dll files inside the Windows/SysWOW64 folder as shown in the screenshot below.


We have put both dll files inside one zip archive, simply extract them and follow the above guidelines to install them.

ေဒါင္းလုဒ္ Msvcp71.dll And Msvcr71.dll
မူရင္းလင့္မွ ေဒါင္းလုဒ္ရယူရန္

Thursday, April 15, 2010

Saw Linux  /  9:59 AM  /    /  No comments
ေစာလင္းနက္စ္


က်ေနာ္ Partition Wizard Professional Edition အေၾကာင္းေလး မိတ္ဆက္ေပးခ်င္တယ္။ မိမိကြန္ပ်ဴတာ
ရဲ႕ HDDကို software ေတြနဲ႔ partition ပိုင္းဖို႔လိုအပ္လာရင္ ဒီ Partition Wizard Professional Edition နဲ႔ ေျဖရွင္းလို႔ပါတယ္။
Partition Wizard Professional Editionသည္ Merge Partition, Convert Dynamic disk to Basic disk and
Change cluster size ေတြ အတြက္အသံုးျပဳႏိုင္သလုိ Resize and Move partitions, Merge Partition,
Copy Partition, Copy Disk, Create, Delete and Format partitions, Convert and Explore partitions,
Hide and Unhide partitions အားလံုးအသံုးျပဳႏိုင္ပါတယ္။ ေနာက္ျပီး Windows 2000, XP, Vista and
Windows 7 တို႔နဲ႔လဲ support လုပ္တယ္။

မူရင္းလင့္

Delete Partition

* To delete a partition, first select the partition you would like to delete. There are three ways to initiate the Delete Partition function:
o a. Click Partitions in the top menu » click Delete.
o b. Click Delete in the Tool Bar.
o c. Click Delete partition under Partition Operations in the Action Panel.


Delete Partition (Video)
ဗြီဒီယိုစလိုက္ရႈိုးၾကည့္ရႈရန္

Software ရယူရန္
Download Software
Saw Linux  /  9:59 AM  /    /  No comments
ေစာလင္းနက္စ္


က်ေနာ္ Partition Wizard Professional Edition အေၾကာင္းေလး မိတ္ဆက္ေပးခ်င္တယ္။ မိမိကြန္ပ်ဴတာ
ရဲ႕ HDDကို software ေတြနဲ႔ partition ပိုင္းဖို႔လိုအပ္လာရင္ ဒီ Partition Wizard Professional Edition နဲ႔ ေျဖရွင္းလို႔ပါတယ္။
Partition Wizard Professional Editionသည္ Merge Partition, Convert Dynamic disk to Basic disk and
Change cluster size ေတြ အတြက္အသံုးျပဳႏိုင္သလုိ Resize and Move partitions, Merge Partition,
Copy Partition, Copy Disk, Create, Delete and Format partitions, Convert and Explore partitions,
Hide and Unhide partitions အားလံုးအသံုးျပဳႏိုင္ပါတယ္။ ေနာက္ျပီး Windows 2000, XP, Vista and
Windows 7 တို႔နဲ႔လဲ support လုပ္တယ္။

မူရင္းလင့္

Delete Partition

* To delete a partition, first select the partition you would like to delete. There are three ways to initiate the Delete Partition function:
o a. Click Partitions in the top menu » click Delete.
o b. Click Delete in the Tool Bar.
o c. Click Delete partition under Partition Operations in the Action Panel.


Delete Partition (Video)
ဗြီဒီယိုစလိုက္ရႈိုးၾကည့္ရႈရန္

Software ရယူရန္
Download Software

Wednesday, April 14, 2010

Saw Linux  /  8:09 PM  /    /  1 comment
ေစာလင္းနက္စ္

Burning CD/ DVD ISO image with Nero Express

က်ေနာ္အခုတင္ျပခ်င္တာ ISO Image file ေတြကို CD/DVD အျဖစ္ Nero နဲ႔ Burn နည္းမသိသူေတြအတြက္
ျဖစ္ပါတယ္။ က်ေနာ္လဲ အရင္ကဆို စမ္းတ၀ါးပါပဲ ဖတ္ရင္လိုက္ရွားရင္းအဆင္ေျပခဲ့တယ္။ အခု ေဒါင္းလုဒ္ထားတဲ့ ISO
Image file မွန္သမွ် ေအာက္ပါနည္းအတိုင္းလုပ္ေဆာင္သြားလွ်င္ အဆင္ေျပသြားမွာပါ။

ဒါေပမယ့္ ဘာသာမျပန္ေတာ့ပဲ မူရင္းအတိုင္းတင္ထားလိုက္တယ္။ အဂၤလိပ္စာမဖတ္တတ္သည့္တိုင္ ပံုကိုၾကည့္ျပီးအလြယ္
တကူလုပ္ေဆာင္ႏိုင္ပါတယ္...

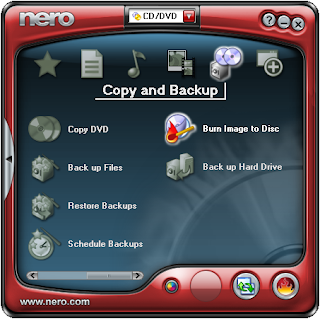
Nero StartSmart: Burn Image to Disc

Start Nero StartSmart and hover the mouse over the icon that looks like two CDs and a safe (Copy and Backup). Next, move the mouse to the scroll bar (or slider) in the left corner of the Nero StartSmart window, and drag the slider to the right. Click on "Burn Image to Disc" in the right part of the window.


Nero StartSmart: Burn Image to Disc.

Nero Express should be started via the StartSmart project launcher, and open a file browser so you can select the DVD ISO image you want to burn. The next steps are explained below.

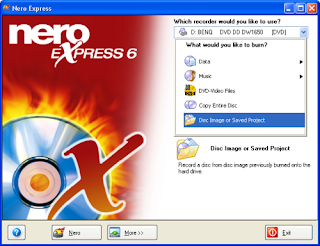
Nero Express: What would you like to burn?

If you prefer not to use the Nero StartSmart project launcher, start Nero Express for example via the start menu. Since I got Nero express with the BenQ DW1650 I installed in my Compaq Pressario, Nero Express on my computer is located in the "Nero OEM" sub group of "Nero" in the "All Programs" menu of the Start menu and so might your version of Nero Express.


Nero Express 6: What would you like to burn?

Select "Disc Image or Saved Project" from the menu displayed under the text "What would you like to burn?". An "Open" dialogue window (file browser) should appear on top of the Nero Express window.


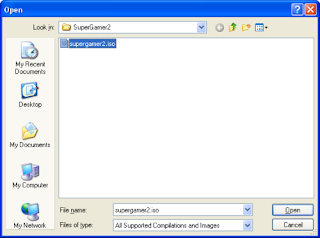
Nero Express file browser, DVD ISO image selected.

Browse to the right folder, select the DVD ISO image (or CD ISO image), and click the Open button. The Image recording dialogue window should now appear.


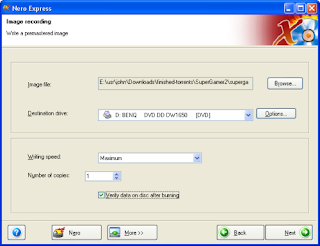
Nero Express: write a premastered image.

I prefer to enable the "Verify data on disc after burning" option. It takes some extra time, but better safe then sorry, especially if you decide to delete the downloaded DVD ISO image after burning.


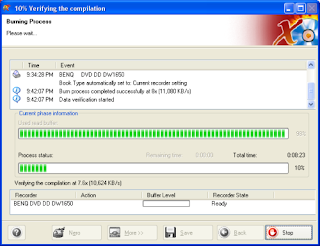
Nero Express: verifying the compilation.

Clicking on the Next button should start the DVD burning process. If you forgot to insert a recordable DVD the program will ask you to place on into the DVD burner.

မူရင္းလင့္

Sunday, April 11, 2010

Saw Linux  /  11:17 AM  /    /  No comments
ေစာလင္းနက္စ္

CMD နဲ႔ folder မ်ား ဖြင့္႕ရေအာင္

က်ေနာ္သိထားတဲ့ကြန္ပ်ဴတာအေၾကာင္းေလးေတြကို မသိေသးသူမ်ားအတြက္ အလွ်င္းသင့္သလို
ေရးသြားမွာျဖစ္ပါတယ္။ သို႔ေသာ္ က်ေနာ္ေရးသားေသာအေၾကာင္းအရာမ်ားသည္ တတ္သိနားလည္
ေသာ ပုဂၢိဳလ္မ်ားထံမွ သင္ယူသိရွိကာတစ္ဆင့္ျပန္လည္ေ၀မွ်ျခင္းျဖစ္ပါတယ္။ က်ေနာ္သိေသာနည္း
ပညာမ်ားကို အျခားမသိေသးေသာပုဂၢိဳလ္မ်ားအတြက္ အဓိကထားျပီးေရးတာျဖစ္သလို မွတ္စုအျဖစ္
သိမ္းထားျခင္းလည္းျဖစ္ပါတယ္။ က်ေနာ္နည္းပညာဆိုင္ရာမွာ ဆရာတစ္ဆူမဟုတ္ပါ တကယ့္ကိုအ
နည္းငယ္မွ်သိျခင္းျဖစ္ပါတယ္။

CMD နဲ႔ folder မ်ားဖြင့္ပံုကို စမ္းၾကည့္ရေအာင္....
ထံုစမ္းအတိုင္း Run {Window + R} ဖြင့္ပါ။ Run box ထဲတြင္ cmd ရိုက္ထည့္ျပီး enter ေခါက္ပါ။
၁။ cd\ ရိုက္ျပီး enter ေခါက္။
၂။ D: ထဲတြင္ foder မ်ားဖြင့္ခ်င္ပါက D:ရိုက္ထည့္ျပီး enter ေခါက္။
(အလားတူ C, E စသည္တြင္ရွိေသာ foderမ်ား ဖြင့္ခ်င္ပါက C: or E: ရိုက္ထည့္ျပီး enter ေခါက္ပါ)
၃။ dir ရိုက္ထည့္ျပီ enter ေခါက္ပါ။


ထိုေနာက္ ေအာက္ပါအတိုင္း folder မ်ား ပြင့္လာတာေတြ႕ရမွာျဖစ္ပါတယ္။


ထို folder မ်ားမွ တစ္ခုခုကို ထပ္ျပီးဖြင့္ခ်င္လွ်င္ (ဥပမာ)"Mg" ဆိုတဲ့ folderကိုထပ္္ဖြင့္ခ်င္လွ်င္ start Mg
ရိုက္ထည့္ျပီး enter ေခါက္ပါ။ ေအာက္ပါအတိုင္း D:ထဲမွာရွိေသာ Mg folder မ်ားပဲျဖစ္ပါတယ္။


ကဲ...အဆင္ေျပပါေစ...

Friday, April 9, 2010

Saw Linux  /  9:50 PM  /    /  No comments
ကြန္ျပဴတာတလံုးမွာ ဟာ့ဒ္၀ဲ နဲ႔ ေဆာ့၀ဲ ဆိုၿပီး အမ်ိဳးအစား ၂မ်ိဳးဘဲ ပါ၀င္ပါတယ္။ ေမာက္စ္၊ ကီးဘုတ္တို႔လို ကိုင္တြယ္ ထိေတြ႕လို႔ရတာေတြက ဟာ့ဒ္၀ဲပါ။ ကြန္ျပဴတာကို ခိုင္းေစႏိုင္ဖို႔ျဖစ္ၿပီး ကိုင္တြယ္ထိေတြ႕လို႔ရတာမ်ိဳးမဟုတ္တာက ေဆာ့၀ဲပါ။

ဟာ့ဒ္၀ဲ (Hardware)
အဓိက ဟာ့ဒ္၀ဲမ်ား
Monitor - ကြန္ျပဴတာမွာ ျဖစ္ပ်က္လုပ္ေဆာင္ေနတာေတြကို ေဖာ္ျပေပးမယ့္ တီဗီဖန္သားျပင္ျဖစ္ပါတယ္။
Keyboard - စာေတြ႐ိုုက္ထည့္ဖို႔ျဖစ္သလို၊ ကြန္ျပဴတာကို အမိန္႔ေပးခုိင္းေစဖို႔လည္း သံုးႏိုင္ပါတယ္။
Mouse - ကြန္ျပဴတာကို အမိန္႔ေပးခုိင္းေစဖို႔ပါ။

System Unit - ကြန္ျပဴတာမွာပါ၀င္တဲ့ ပစၥည္းအားလံုးကို ဆက္စပ္ထိန္းခ်ဳပ္ေပးသူျဖစ္ပါတယ္။
Motherboard (CPU) - ကြန္ျပဴတာဆက္စပ္ပစၥည္းအားလံုး ဒီမွာလာၿပီး ဆက္သြယ္ထားရပါမယ္။
Hard Disk Drive - Operation System အလုပ္လုပ္ဖို႔၊ အခ်က္အလက္ေတြ သိမ္းဆည္းဖို႔ပါ။
CD/DVD Rom - အေခြေတြ ဖြင့္ဖို႔ပါ။
Memory Card (RAM) - ယာယီမွတ္ဉာဏ္ျဖစ္ပါတယ္။ ကြန္ျပဴတာ အေႏွးအျမန္ဟာ သူနဲ႔အဓိက သက္ဆိုင္ပါတယ္။
Sound Card - အသံထြက္ေစဖို႔ပါ။
Video Card (VGA) - ႐ုပ္ပံုေတြ ျမင္ရေစဖို႔ပါ။
LAN Card - အျခားကြန္ျပဴတာေတြကိုဆက္သြယ္ဖို႔၊ အင္တာနက္ခ်ိတ္ဖို႔အတြက္ပါ။
Power Supply - ဒီကေန ပါ၀ါႀကိဳးေတြကေနတဆင့္ ကြန္ျပဴတာပစၥည္းေတြကို လွ်ပ္စစ္အားေပးပါတယ္။
Data Cable - အခ်က္အလက္ေတြ ကူးေျပာင္းဖို႔ပါ။
Battery - ကြန္ျပဴတာမီးေတြ အားလံုးပိတ္ထားခ်ိန္မွာ မွတ္ဉာဏ္ေတြ ေပ်ာက္မသြားေစဖို႔။
USB Port - ယူအက္စ္ဘီက ေဒတာေရာ၊ ပါ၀ါကိုပါ ႀကိဳးတခုတည္းနဲ႔ ရရွိလုပ္ေဆာင္ေစႏိုင္တဲ့အတြက္ မရွိမျဖစ္ အသံုးျပဳေနၾကပါၿပီ။
ျပင္ပဟာ့ဒ္၀ဲမ်ား (Extra Hardware)
ကြန္ျပဴတာအလုပ္လုပ္ျခင္းႏွင့္ မသက္ဆိုင္ေသာ ဟာ့ဒ္၀ဲမ်ား
Printer - စာရြက္မ်ားထုတ္ယူဖို႔ ျဖစ္ပါတယ္။
Scanner - ႐ုပ္ပံုေတြ ကြန္ျပဴတာထဲ ကူးထည့္ဖို႔ပါ။
Sound box/Ear phone - အသံေတြနားေထာင္ဖို႔၊ စကားေျပာဖို႔။
Web camera - ၀ဘ္ကမ္ရွိမယ္ဆိုရင္ တဘက္စကားေျပာသူက ကိုယ့္ကိုျမင္ရပါလိမ့္မယ္။ မ်က္ႏွာခ်င္းဆိုင္ စကားေျပာခ်င္ရင္ေတာ့ ႏွစ္ဘက္လံုးမွာ တပ္ထားေပါ့ဗ်ာ။

ေစာေက်ာ္ခေရာ့စ္
Saw Linux  /  12:50 AM  /    /  No comments
ေစာလင္းနက္စ္

Mozilla Start page ျပန္ေပၚေအာင္လုပ္နည္း


ဒါကေတာ့ Mozilla Firefox Homepage ကေန တစ္ျခား ၀က္ဆိုက္စာမ်က္ႏွာမ်ား ေျပာင္းသြားတဲ့အခါ
ျပန္ျပီး မူရင္း Mozilla Firefox စာမ်က္ႏွာေပၚေအာင္ လုပ္နည္းျဖစ္ပါတယ္။ မသိေသးသူမ်ားအတြက္သာ ရည္ရြယ္ပါတယ္။ သိျပီးသူမ်ားအတြက္ ဟီး ဟီး.....
တကယ္ေတာ့ ဒါသိသြားရင္ မိမိရဲ႕Mozilla Firefox Homepageေနရာမွာ ၾကိဳက္တဲ့ ၀က္စာမ်က္ႏွာနဲ႔ထားလို႔ရပါ
တယ္။
ကဲ...လုပ္ၾကရေအာင္..

၁။ Mozilla Firefox အိုင္ကြန္ကို ႏွိပ္။ Mozilla Firefox ရဲ႕ serch using engin အကြက္တြင္ mozilla firefox start
homepage ဆိုတဲ့စာေခ်ာင္းကို ရိုက္ထည့္ပါ။ ျပီးေတာ့ enter ကိုေခါက္။


၂။ ေပၚလာတဲ့ စာေခ်ာင္းမ်ားတြင္ Mozilla firefox start page ကို ႏွိပ္။


၃။ ေနာက္ address ဘားေပၚတြင္ သူ႔ရဲ႕လင့္ကို copy ယူထားလိုက္ပါ။


၄။ Mozilla firefox တြင္ menu ဘားမွာရွိေသာ tools ကို ကလစ္ႏွိပ္၊ option ကိုဆက္ႏွိပ္။ ထိုေနာက္ ေဘာက္စ္
တစ္ခုက်လာလိမ့္မယ္ general ကိုႏွိပ္။ Home page အကြက္ထဲတြင္ copy ယူထားေသာ လင့္ကို paste ခ်လိုက္
ျပီး OK ေပါ့။


Mozilla firefox ကိုပိတ္ျပီး ဖြင့္ၾကည့္လိုက္ အားလံုးအဆင္ေျပသြားပါလိမ့္မည္။

မွတ္ခ်က္ = မိမိထားလိုေသာ ၀က္ဆိုက္စာမ်က္ႏွာမ်ားကို copy လင့္ယူျပီး နံပါတ္ (၄)Home page အကြက္ထဲတြင္paste ခ်၊ ok ႏွိပ္။ Mozilla firefox ကိုပိတ္ျပီး ျပန္ဖြင့္။

Thursday, April 8, 2010

Saw Linux  /  9:02 PM  /    /  No comments
ေစာလင္းနက္စ္

Gtalkတြင္ Mail icon ကို ႏွိပ္ျပီး Mozilla ျဖင့္ တိုက္ရိုက္ပြင့္ေအာင္လုပ္နည္း

ဟုတ္ကဲ့ က်ေနာ္လဲ မအားတာနဲ႔ ဘေလာ့ဖက္ကို သိပ္မလွည့္ႏုိုင္ဘူး။ ဒါေပမယ့္ တစ္ခ်ိဳ႕ကြန္ပ်ဴတာမွာ Gtalkတြင္ Mail icon ကို ႏွိပ္လိုက္တာနဲ႔ Mozilla Broswerနဲ႔ ပြင့္မလာပဲ၊ Enternet Explorer နဲ႔ ပြင့္လာတာေတြ႕ရတယ္။ အဲဒါကို mozilla firefoxနဲ႔ တိုက္ရိုက္ ပြင့္ေစခ်င္ရင္ ေအာက္ပါအခ်က္ေတြျဖင့္လုပ္ပါ။ အဆင္ေျပသြားပါလိမ့္မယ္။

Gtalk တြင္ Setting ကိုႏွိပ္။


၁။ box တစ္ခုက်လာပါလိမ့္မယ္ general ကို ႏွိပ္ပါ။
၂။ ထိုေနာက္ Open Gmail When I click on email links တစ္ျခစ္လိုက္ပါ။ ျပီးေတာ့ OK
ႏွိပ္။

ျပီးေတာ့ Mozilla firefox ကိုဖြင့္။ Menu ဘားတြင္ရွိေသာ tools = option ကိုဆက္ႏွိပ္။


၃။ ေပၚလာေသာေဘာက္စ္တြင္ Menu ဘားတြင္ရွိေသာ advance ကိုႏွိပ္။
၄။ System defualt ေအာက္မွာရွိေသာ Always check to see .........အကြက္ တစ္ျခစ္
လိုက္ပါ။
Mozilla firefox ကို ပိတ္ျပီး ျပန္ဖြင့္လိုက္

အဆင္ေျပပါေစ....

Search