welcome to Sawlinux, this is sharing the site of PC

Video Post


stat counters
Follow us on Twitter Subscribe to RSS Subscribe via Email

Tuesday, October 16, 2012

Saw Linux  /  6:49 AM  /    /  No comments
ကဲ...Video Editing အတြက္ ထိပ္တန္း Desktop Tool (5) မ်ိဳးကိုတင္ေပးလိုက္မယ္။ Desktop အတြက္
ဆိုတာ ဘာလဲဆိုေတာ့ OS (operation system) နဲ႔အတူ အဆင္သင့္အသံုးျပဳဖို႔ open source ေပး
ထားတဲ့ application မ်ိဳးကို Desktop tool လို႔ေခၚေ၀ၚသံုးစြဲျခင္းျဖစ္ပါတယ္။
ၾကိဳက္ရင္ေတာ့ ေဒါင္းျပီး သံုးၾကည့္ေပါ့ေနာ္။ သူတို႔ရဲ႕ performance ေတြကိုေတာ့ ေအာက္ပါ အတိုင္းေရးထားပါတယ္။ ဘာသာျပန္ရတာ ပ်င္းတာနဲ႔ ဒီအတိုင္းပဲတင္ေပးလိုက္တယ္။

1. Microsoft Movie Maker

Windows Movie Maker usually comes along with your Windows. It is one of the most simplest video editing software that I have ever used, specially the one that came out with Windows Vista because it includes lots of new editing features in it. Not only  you can access the commands for common tasks quickly by using the toolbars but you can also capture, edit and produce your favorite video using this tool very easily. In Windows Xp Movie Maker has drag and drop features to create and edit movies easier. Microsoft has many add-ons for this software, and upgrades are available through the website. This is one of the easiest free video editing software programs available.
Windows-Movie-Maker_2.1
Download [ Windows Movie Maker 2.6 for Windows Vista ]
Download [ Windows Movie Maker 2.1 for Windows Xp ]

2. Wax

Wax is a high performance and flexible video editing software. It started out as a college project, and has since grown. Wax is good for both home users and professionals. It can be used as a stand-alone application, or as a plug-in to other video editors. The software also features unlimited video and audio tracks with top-down composition.It has following features
  • Use graphics acceleration available with your video card for creating mind-boggling effects in realtime or near-realtime.
  • 2D and 3D Plugins and transitions for creating effects. Full featured 3D composition with 3d objects, lighting, shadows, texture generators, etc.
  • Plugin Adapter technology – can load and use VirtualDub filters, DirectX plugins, Freeframe plugins and Windows Movie Maker presets inside Wax or your NLE when using Wax as a plugin.
  • Full featured project management with media bins/folders, element properties and comments for ease of use.
  • Transition and Plugin SDK available for developers to extend functionality by adding external plugins. WinMorph uses this Plugin SDK to extend Wax’s functionality for warping and morphing.
  • File input/output through filters, Filter SDK available upon request for developers to extend file format support.
  • Input formats : AVI, WAV, all popular image formats.
  • Output formats : AVI, MPEG, WAV, Flash, all popular image formats. (AVI and WAV formats support compressed audio too, using Audio Codecs installed in your PC).

Download [ Wax ]

3. Apple iMovie

Apple iMovie is comparable to Windows Movie Maker, but it is used on the Mac operating system. Although it has many advanced features and add-ons but unfortunately it is only free if you buy a new MAC system. If you want the software without buying the system, it is available for purchase. iMovie supports standard and high definition (HD) video, as well as the most popular video formats, including DV, HDV, MPEG-2 and MPEG-4. Major new features and enhancements compared to iMovie 3 and its predecessors:
  • Direct trimming of video and audio clips in the timeline.
  • Snapping sync for video and audio, audio waveforms and listening to audio while scrubbing.
  • Multiple clip selection, direct import from iSight.
imovie_main
Download [ iMovie ]

4. Vivia-The Video Editor

Vivia is a video editing program for Linux and Windows. It provides extremely easy editing of clips and transitions in real-time, along with multi-camera support for editing scenes that were recorded by more than one camera simultaneously. One of the most interesting feature of vivia is that it has crash recovery. I can’t tell you how many times you freak out over a crashed application that doesn’t save your work. It also does real-time changes when edited so you can see the results right away. I would certainly like to see more formats supported, but the overall interface is great and is quite easy to understand.
screenshot1
download [ Vivia Video Editor ]

5. Blender

Blender is a widely used open source application for 3D modeling and animation. Perhaps not so well known feature of blender is its ability to edit video and audio, thanks to its sequence editor. In fact, it is a full blown non-linear editing module, which allows to apply numerous effects, as well as doing simple tasks as blending clips together, adding transitions, etc.
I have been using it recently to do some basic video editing, and I think it keeps up quite well in comparison with other, more “professional”, video editing tools. Since blender has its own unique interface, which doesn’t follow the conventions adopted by other programs (it is heavily optimized for a keystroke-oriented workflow), it might be a little bit difficult at the beginning, but once you learn the basic elements of the interface, is in fact very intuitive.
9931f3.resized
Download [ Blender ]

Ref : http://www.addictivetips.com/windows-tips/top-5-desktop-tools-for-video-editing/
Saw Linux  /  4:20 AM  /    /  No comments
က်ေနာ္ Windows Movie Maker နဲ႔မိတ္ဆက္ေပးခ်င္ပါတယ္။ မသိေသးေသာ မရင္းနွွီးေသးေသာပုဂၢိဳလ္မ်ားအ တြက္ေပါ့ေနာ္။ က်ေနာ္လဲ ဒီတစ္ရက္ႏွစ္ရက္အတြင္ ဗြီဒီယိုဖိုင္ေလးေတြကိုတည္းျဖတ္ရင္းနဲ႔ လြယ္လဲလြယ္ ေကင္း လဲေကာင္းမယ့္ Text Intro Title ေလးေတြကို ဖန္တီးႏိုင္မယ့္ ပရိုဂရမ္ေလးေတြကို လိုက္ရွာျဖစ္ခဲ့တယ္။ Text Intro Title ေလးေတြကို ဖန္တီးႏိုင္မယ့္ ပရိုဂရမ္ေလးေတြကို ေတာ္ေတာ္မ်ားေတာ့ေတြ႕ခဲ့ပါတယ္။ တစ္ခ်ိဳ႕ က ေကာင္းေသာ္လဲ ဖူးဗားရွင္းမရတာနဲ႔ စိတ္ၾကိဳက္မျဖစ္ဘူးေလ။ Text Intro Title ေလးေတြကို ဖန္တီးႏိုင္မယ့္ ပရိုဂရမ္ထဲမွာ Windows Movie Maker ဟာ မဆိုးဘူးဗ်ာ။ ၀င္းဒိုးအသံုးျပဳသူမ်ားအေနနဲ႔ အသံုးတည့္တဲ့ tool တစ္ခုျဖစ္ပါတယ္။ Microsoft ကေန ဖရီးေပးထားတဲ့ ပရိုဂရမ္ေလးပါ။

 ဒီ ပရိုဂရမ္ေလးဟာ Text Intro Title  တစ္ခုတည္းကိုသာျပဳလုပ္လို႔ရတာမဟုတ္။ တစ္ျခား video
edit ေဆာ့၀ဲမ်ားနည္းတူ ဗြီဒီယိုတည္းျဖတ္လို႔လဲရပါတယ္ခင္ဗ်ာ။

အသံုးျပဳရတာလဲမခက္ပါဘူး။ ပရိုဂရမ္ကိုထည့္သြင္းလိုက္ျပီးလွ်င္ ဖြင့္လုိက္ပါ။ ျပီးလွ်င္ သူ႔ရဲ႕ screenshot ဘယ္ ဖက္ အျခမ္းမွာ ၾကည့္လိုက္တာနဲ႔ ဗြီဒီယိုတည္းျဖတ္ဖူးတဲ့ပုဂၢိဳလ္မ်ား လုပ္တတ္ျပီးသားျဖစ္ပါမယ္။


Download :
Microsoft.com

ေစာလင္းနက္စ္
 

Sunday, October 14, 2012

Saw Linux  /  11:01 PM  /    /  No comments
ဒီေဆာ့၀ဲကေတာ့ video editing သမားေတြ ေနာက္ျပီး မိမိဓာတ္ပံုမ်ားကို slideshow ျပဳလုပ္လိုသူမ်ားအတြက္ အေတာ္အသံုးတည့္တယ္။ video editing ဆိုတဲ့ေနရာမွာ အစပိုင္း intro ကို မိမိစိတ္ၾကိဳက္ဖန္တီးဖို႔ ဒီေဆာ့၀ဲနဲ႔ ဆို မဆိုးဘူးလို႔ေျပာရမယ္။ မိမိလုပ္ထားျပီးေသာ slideshow ေတြကို ၾကိဳက္တဲ့ ေဖါမက္နဲ႔ output ထားလို႔ရ တယ္။ က်ေနာ္ကေတာ့ အသံုးလဲတည့္တယ္။ ဖူးဗားရွင္းလဲျဖစ္တယ္ဆိုရင္ ၾကိဳက္တာပဲ။


Download Wondershare DVD Slideshow :
Wondershare DVD Slideshow (Ziddu)
 Keycode

 ေအာက္က ဒီေဆာ့၀ဲနဲ႔ လိုအပ္မယ့္ system requirement :

System Requirements


  • OS: Windows 7, Vista and XP
  • Resolution: 800x600 display
  • CPU: Pentium IV 2.4 GHz or above
  • RAM: 512MB system memory
  • Display Card: Accelerated 3D graphics - 64MB RAM
  • Sound Card: Windows-compatible sound card
  • DVD Driver: DVD+R/RW/-RW Burner
  • Hard Disk: 10 GB hard drive space
  • Others: Windows Media Player 11 or above; DirectX 9.0 or above
Features:

Add All Contents Instantly


  • Add up to 1024 photos / videos in one slideshow
  • Add video from disk and capture video from TV card and Webcam easily
  • Create more than one soundtrack by adding MP3, WMA or WAV file to slideshow
  • Drag and drop to easily add content to a show
  • Sort slideshows in designed order.
  • Support more input (GIF, TIF) and output formats ( MOV, FLV and ASF).
Special Effects that Amaze
  • Add desired transition and motion effects to Favorites category
  • Bring photos to life with motion effects
  • Choose from 125+ 2D / 3D transition effects ~Improved
  • Randomize motion and transition effects for your slideshow in seconds.
Customize Individually
  • Control timing for each slide, including transition & motion effects
  • Easy to customize a personalized DVD menu to match any occasion
  • One-click to automatically synchronize video and audio
  • Record voice-over narrations for personalized movie
Fast and Easy Show Creation
  • 100+ DVD menu templates for easy DVD creation for TV
  • Author motion DVD menu based on dynamic menu templates
  • Real-time preview your project with a virtual remote
  • Storyboard/Timeline Mode gives you the flexibility to view projects the way you like
  • Timeline view makes it easier to control the timing in your show
Share Shows Virtually Anywhere
  • Avoid TV clipping with integrated Safe Mode
  • Combine both TV and PC playback on the same disc
  • Fully-integrated media DVD authoring for any standard DVD player
  • Supports NTSC and PAL for international playback compatibility
  • Switch between 4:3 and 16:9 aspect ratio for DVD menu and video
  • Upload your video on YouTube for podcast
Output Formats – Ready for HD DVD

Saturday, October 13, 2012

Saw Linux  /  1:33 AM  /    /  No comments


 ဟိုလုပ္ဒီလုပ္နဲ႔ ပို႔စ္မတင္ျဖစ္တာေတာင္ ေတာ္ၾကာသြားျပီး ဗီြဒီယိုတည္းျဖတ္တဲ့ေနရာမွာအသံုးတည့္တဲ့ Adobe Premier Pro CS2 တင္ေပးလိုက္တယ္။ CS6 ဗားရွင္းထိရွိျပီးေသာ္လည္း က်ေနာ္က ဖူးဗားရွင္းအသံုးျပဳႏိုင္မယ့္ ေဆာ့၀ဲေတြကိုပဲ ဦးစားေပးတင္ေလ့ရွိပါတယ္။ အ CS2 သည္လည္း ဖူးဗားရွင္းျဖစ္ေအာင္ activator ပါ ပါသည့္ အတြက္ ငါတို႔လိုဖရီးသမားမ်ားအတြက္အဆင္ေျပေတာ့ တင္ေပးလိုက္တဲ့သေဘာပါ။ Activator ဖူးဗားရွင္းျဖစ္ ေအာင္လုပ္နည္းကေတာ့ မခက္ပါဘူး။ က်ေနာ္အလြယ္နည္းပဲေျပာေပးလိုက္မယ္...

Activate ဖူးဗားရွင္းျပဳလုပ္နည္း 

၁။ ကီးဂ်င္းကိုအရင္ဖြင့္ထားလုိက္ပါ ျပီးေတာ့ generate ကိုႏွိပ္ျပီး ကီးကိုေကာ္ပီယူထားလိုက္ပါ
၂။ Adobe Premier Pro CS2 ကို အင္စေတာေမာင္းပါ ကီးေဘာက္စ္ေတာင္းလာရင္ ခုဏကေကာ္ပီကူးထားတဲ့ ထည့္လိုက္ပါ။
 ၃။ ကြန္ပ်ဴတာကို Restart ခ်ျပီး စက္ကိုျပန္ပြင့္လာရင္ Adobe Premier Pro CS2 ပရိုဂရမ္ကိုဖြင့္လိုက္ပါ။ ခဏ ၾကာရင္ Activation ေဘာက္စ္ေပၚလာမည္။ Activation Option ကိုႏွိပ္ျပီး Telephone Option ကိုႏွိပ္ျပီး Next ကိုႏွိပ္လိုက္ပါ။
 ၄။ ေနာက္ေဘာက္စ္တြင္ Activation Number ကိုေကာ္ပီယူျပီး ခုဏဖြင့္ထားတဲ့ ကီးဂ်င္းထဲမွာ အလယ္တည့္ တည့္အကြက္တြင္ paste ခ်လိုက္ပါ။ ၎မွာ ေအာက္ဆံုးအကြက္တြင္ Activation code ရလာမည္။ အဲဒါကို ေကာ္ပီယူျပီး ၎ Activation ေဘာက္စ္ရဲ႕ေအာက္ဆံုးအကြက္တြင္ paste ခ်ျပီး Next ကိုသာႏိွပ္ရံုပါပဲ။

ကဲ...ၾကိဳက္ရင္ေတာ့ ေဒါင္းသာေဒါင္းဗ်ာ...

Download :
rapidshare.com

ေစာလင္းနက္စ္

Friday, October 5, 2012

Saw Linux  /  12:59 AM  /  ,   /  No comments
shortcut virus ရွင္းထုတ္ႏိုင္တဲ့ ေဆာ့၀ဲကိုျပီးခဲ့တဲ့ပို႔စ္ကို တင္ခဲ့ပါျပီး။ shortcut virus ဆိုတာ က်ေနာ္တို႔အသံုးျပဳတဲ့ external HDD, USB Pen Drive ေတြကို ကူးဆက္ခံရလွ်င္ ၎တို႔မွာရွိတဲ့ ဖိုလ္ဒါမ်ားဟာ shortcut icon ေတြအား လံုးျဖစ္သလို တစ္ခါတစ္ေလ HDD, USB Flash ေတြမွာ ဖိုင္၊ ဖိုလ္ဒါေတြရွိေသာ္လည္းမျမင္ရေအာင္ ၎ဗိုင္းရပ္စ္က ပိတ္ထားတတ္ပါတယ္။

အဲဒီျပႆနာကိုေျဖရွင္းဖို႔ ျပီးခဲ့တဲ့ပို႔စ္က ေဆာ့၀ဲနဲ႔ေျဖရွင္းႏိုင္သလို အခုေျဖရွင္းႏိုင္တဲ့နည္းလမ္းတစ္ခ်ိဳ႕ကိုပါထပ္မံ တင္ျပျခင္းျဖစ္ပါတယ္။ အသံုးတည့္မယ္ထင္လို႔ ထပ္ရွယ္လိုက္တဲ့သေဘာပါ။

၁။ "Start" -->Run --> cmd ကိုရိုက္ထည့္ျပီး Enter.

၂။ ေအာက္ပါ command ရိုက္ထည့္ျပီး Enter ေခါက္ပါ။

attrib -h -r -s /s /d k:\*.* 

မွတ္ခ်က္ = k ဆိုတဲ့ေနရာမွာ မိမိရဲ႕ HDD, USB pen drive ရဲ႕ letter ကိုေရြးပါ။

အဲဒါျပီးရင္ မိမိရဲ႕ HDD, USB Flash Drive ကိုျပန္ဖြင့္ၾကည့္ပါ။ အဆင္ေျပသြားပါလိမ့္မယ္။

အေပၚက CMD နဲ႔ ရွင္းထုတ္ရတဲ့နည္းကခက္တယ္လို႔ထင္ရင္ bat ဖိုင္နဲ႔လဲတင္ေပးလုိက္မယ္။ စမ္းၾကည့္ေပါ့။ ဒါနဲ႔လဲ အဆင္ေျပသြားနိုင္တယ္။  
 
ShortcutVirusRemover.bat 

ေစာလင္းနက္စ္

Thursday, October 4, 2012

Saw Linux  /  7:44 PM  /  ,   /  No comments
ဒီ Shortcut Virus Remover ေဆာ့၀ဲဟာ အေတာ္ေလးအသံုးတည့္ပါတယ္။ မိမိ enternal HDD, UBD Pen Drive တို႔ကို shortcut virus ၀င္ေရာက္သြားျပီးဆိုရင္ ၎တို႔မွာ ရွိတဲ့ဖိုလ္ဒါမွန္သမွ် shortcut ေတြျဖစ္သြားျပီး အဲဒီ enternal HDD, USB Pen Drive တို႔မွာ ဖိုလ္ဒါေတြရွိရင္လဲ ျမင္ရေတာ့မွာမဟုတ္ပါဘူး။ အဲဒီျပႆနာကိုေျဖရွင္းနိုင္ဖို႔ ဒီေဆာ့၀ဲေလးကိုအ အသံုးျပဳလိုက္ရင္ အဆင္ေျပမွာပါ။ Shortcut Virus Remover V3 နဲ႔ V2 (Beta) ႏွစ္ခုစလံုးတင္ေပးလိုက္တယ္။ ၾကိဳက္ တာေဒါင္းေပါ့ဗ်ာ။ V3 ကေတာ့ ပုိေကာင္းတာေပါ့ေလ။ ေဆာ့၀ဲက portable လဲျဖစ္တယ္။ ေဆာ့၀ဲကအသံုးျပဳရတာလြယ္ ပါတယ္။ ကဲ ေအာက္ပါေဒါင္းဗ်ာ...


Downoload Link :
Shortcut Virus Remover v3.rar
 Virus Shortcut Remover v2.1(Beta).rar

ေစာလင္းနက္စ္

Tuesday, October 2, 2012

Saw Linux  /  6:40 PM  /    /  No comments

အရင္တုန္းက computer ေလာကမွာ Apple ရဲ႕ Mac OS သံုးတဲ့ computer ၀ယ္ရမလား၊ Microsoft Windows OS သုံးထားတဲ့ IBM compatible computer ပဲ ၀ယ္ရမလား ဆိုၿပီး အဓိက အမ်ိဳးအစားၾကီး ၂ မ်ိဳးကြဲေနပါတယ္။
Apple ရဲ႕ ကြန္ပ်ဴတာေတြနဲ႔ IBM compatible ျဖစ္တဲ့ ကြန္ပ်ဴတာေတြက နည္းပညာ၊ architecture မွာ လံုး၀ မတူခဲ့ၾကတဲ့ အတြက္ သီးသန္႔စီလို ျဖစ္ခဲ့ပါတယ္။ ဒါေပမယ့္ ၂၀၀၆ ခုႏွစ္ ေလာက္က စၿပီး Apple က သူ႔ကြန္ပ်ဴတာေတြမွာ Intel ရဲ႕ CoreDuo နဲ႔ Core2Duo CPU ေတြကို သံုးခဲ့တာကေန စၿပီး ကြန္ပ်ဴတာ ေလာကရဲ႕ အေျခအေန တစ္မ်ိဳးေျပာင္းသြား ခဲ့ပါတယ္။
Apple က သူ႔ကြန္ပ်ဴတာေတြ ထဲမွာ Intel ရဲ႕ Core2Duo processor ေတြကို သံုးလာတ့ဲ အခ်ိန္ကစၿပီး သူ႔ရ႕ဲ ကိုယ္ပိုင္ နာမည္ၾကီး Mac (Macintosh) operation system ကိုလည္း နည္းပညာပိုင္းမွာ ေျပာင္းလဲခဲ့ပါတယ္။ ဆိုလိုတာက Mac OSX ကို Core2Duo CPU ေတြနဲ႔ အလုပ္လုပ္ ႏိုင္ဖုိ႔ ျပင္ၿပီး ေရးခဲ့ပါတယ္။ ဒီေတာ့ Core2Duo CPU ကို သံုးထားတဲ့ Apple စက္ေတြအတြက္ ေရးထားတဲ့ Mac OS X ဟာ Core2Duo architecture နဲ႔ တည္ေဆာက္ထားတဲ့ IBM compatible ကြန္ပ်ဴတာေတြမွာလည္း ထည့္သံုးလို႔ ရမယ့္ အေနအထား ျဖစ္သြားတာေပါ့။ သူတို႔က နည္းပညာ အေျခခံပိုင္းမွာ အတူတူပဲေလ။ ဒီလိုနဲ႔ hacker ေတြက Mac OS X ကို ပံုမွန္ PC ေတြမွာ install လုပ္သံုးႏိုင္ေအာင္ ဖန္တီးခဲ့ၾကပါတယ္။ (ဒီအေၾကာင္းကို post တစ္ခု ေရးခဲ့ပါတယ္)

ဒီတစ္ခါ ေျပာခ်င္တာက Mac OSX အေၾကာင္း မဟုတ္ပါဘူး။ Apple က ထုတ္တဲ့ MacBook နဲ႔ MacBook PRO ဆိုတဲ့ laptop ေတြက လူၾကိဳက္မ်ားပါတယ္။ သူတို႔ရဲ႕ ျဖဴေဖြးေနတဲ့ body color နဲ႔ design က တစ္ျခား PC laptop ေတြနဲ႔ ယွဥ္ၾကည့္ရင္ မ်က္စိက်စရာ ေကာင္းလွပါတယ္။ အထူးသျဖင့္ မိန္းကေလးေတြ ပိုသေဘာက်မယ္ ထင္ပါတယ္။ တစ္ကယ္ကို စြဲမက္စရာ ေကာင္းလွပါတယ္။ ၿပီးေတာ့ Mac Mini ဆိုတဲ့ ကြန္ပ်ဴတာေလး ဆိုရင္လည္း ထမင္းဘူးေလး ေလာက္ပဲ ရိွၿပီး ခ်စ္စရာ သိပ္ေကာင္းပါတယ္။ ေစ်းလည္း သိပ္မမ်ားပါဘူး။ အသံလည္း ၿငိမ္တယ္။ ေပါ့လည္း ေပါ့တယ္ေလ။ ေသးေသးေလး ေပမယ့္ အထဲမွာ ကြန္ပ်ဴတာ တစ္လံုး ပါရမယ့္ အရာ အားလံုးပါပါတယ္။ Windows OS ကိုသာ ထည့္သံုးမယ္ ဆိုရင္ အေသးဆံုး၊ ခ်စ္စရာ အေကာင္းဆံုး PC ေလးလို႔ေတာင္ ေျပာလို႔ရမယ္ ထင္ပါတယ္။
ဒါေပမယ့္ ခက္တာက အဲဒီ လို ခ်စ္စရာ၊ စြဲမက္စရာ ေကာင္းတဲ့ Mac Mini, MacBook (white) နဲ႔ MacBook PRO ကြန္ပ်ဴတာေတြက Apple ဆိုေတာ့ ပံုမွန္အားျဖင့္ Mac OS X ကို သံုးထားၾကပါတယ္။ Mac OSX (Leopard) ဆိုတဲ့ operating system က သံုးရတာ ေကာင္းပါတယ္။ ဒါေပမယ့္ ေတာ္ရံုတန္ရံု user ေတြနဲ႔ friendly မျဖစ္တဲ့ျပင္ Windows (အထူးျဖင့္ dotNET) developer ေတြအတြက္လည္း အဆင္မေျပပါဘူး။ သူက Windows နဲ႔ လံုး၀မတူတဲ့ operating system တစ္ခု ျဖစ္ေနတာကိုး။ Business user ေတြနဲ႔ တစ္ျခား Windows တင္မဟုတ္တဲ့ developer ေတြကေတာ့ သံုးၾကပါတယ္။ ဒါေပမယ့္ Windows သံုးတာနဲ႔ ယွဥ္ရင္ အေရအတြက္ မမ်ားဘူးလို႔ ေျပာလို႔ရပါတယ္။ Apple က hardware quality လည္းေကာင္းပါတယ္။

ဒီေတာ့ တစ္ခ်ိဳ႕က MacBook အျဖဴေရာင္ laptop ေလးေတြကို သေဘာက်တယ္။ ခ်စ္စရာ ေကာင္းတယ္ လို႔လည္း လက္ခံတယ္။ ဒါေပမယ့္ သံုးခ်င္တာက Widnows OS ျဖစ္ေနေတာ့ အေ၀းကေနပဲ လြမ္းခဲ့ရပါတယ္။
အခုေတာ့ Apple ကိုယ္တိုင္ကေန သူ႔ရဲ႕ Intel Core2Duo သံုးထားတဲ့ Apple computer ေတြထဲကို Windows OS ကို install လုပ္ၿပီး သံုးလို႔ရေအာင္ support ေပးလိုက္ပါၿပီ။ ဒါေၾကာင့္ Apple laptop ေလးေတြနဲ႔ Windows OS သံုးခ်င္သူေတြ အတြက္ ၀မ္းသာစရာပါ။
Apple က သူ႔ရဲ႕ Core2Duo CPU ကို သံုးထားတဲ့ iMac, Mac Mini, MacBook, MacBook PRO စတဲ့ ကြန္ပ်ဴတာေတြမွာ BootCamp ဆိုတဲ့ software ေလးကို ထည့္ေပးခဲ့ပါတယ္။ အဲဒီ BootCamp software ေလးကို သံုးၿပီး hard disk ကို partition အသစ္ခြဲလိုက္ၿပီး Windows XP, Windows Vista နဲ႔ Windows 7 တို႔ကို ထည့္လု႔ိရပါတယ္။ ေကာင္းေကာင္း အလုပ္လုပ္ပါတယ္။ Dual Boot လုပ္တယ္လို႔ ေျပာလို႔ရပါတယ္။ အဲလို Dual Boot မလုပ္ခ်င္ဘူး ဆိုရင္လည္း Core Fusion လို software ေတြ သံုးၿပီးေတာ့ Virtual Machine ပံုစံနဲ႔ Mac OSX ေရာ၊ Windows OS ေရာ ႏွစ္ခုလံုးကို တစ္ၿပိဳင္နက္ထဲ run ခ်င္၊ သံုးခ်င္လည္း ရပါတယ္။ ဒါေပမယ့္ BootCamp နဲ႔ သီးသန္႔စီ dual boot လုပ္တာက ပိုေကာင္းတာေပါ့ေနာ္။

အဲဒီလို Apple Mac ကြန္ပ်ဴတာထဲကို Boot Camp သံုးၿပီး Windows OS ကိုထည့္တာဟာ ေကာင္းေကာင္း compatible ျဖစ္ပါတယ္။ Device Driver ေတြ အတြက္လည္း မပူပါနဲ႔။ BootCamp ကို သံုးရင္ Winodws driver ေတြကို Apple computer အတြက္ တစ္ခါထဲ ဖန္တီးေပးပါတယ္။ Microsoft Visual Studio ကိုေတာင္ install လုပ္ၿပီး အလုပ္လုပ္လို႔ ရပါတယ္။ Windows application ေတြကိုလည္း develop လုပ္လို႔ရတယ္ေလ။ Windows နဲ႔ ပံုမွန္ သံုးေနတဲ့ အတိုင္း အားလံုး လုပ္လုိ႔ရတယ္ ဆိုပါေတာ့။ Windows OS အတြက္ ေရးထားတဲ့ DirectX, OpenGL သံုးတဲ့ game ေတြ အားလံုးလည္း ကစားလို႔ ရပါတယ္။ မ်ားေသာအားျဖင့္ Apple MacBook, Mac Mini ေတြက Nvidia ရဲ႕ Geforce 9400M graphic chipset ေတြနဲ႔ လာတ့ဲအတြက္ graphic စြမ္းရည္ေကာင္းပါတယ္။ Mac Book PRO ဆိုရင္ Geforce 9600GT လို အျမင့္စား graphic processor ေတြေတာင္ ပါပါတယ္။ ဒါေၾကာင့္ Windows Vista ထည့္ၿပီး ေကာင္းေကာင္း အလုပ္လုပ္လု႔ိ ရသလို၊ game ေတြလည္း ကစားလို႔ ရေစပါတယ္။

Apple Mac Book (white) ေလးထဲကို Windows Vista ကို boot camp နဲ႔ ထည့္တာ လံုး၀ အဆင္ေျပတယ္ ဆိုပါတယ္။ Left4Dead, Brothers in Arms လို အဆင့္ျမင့္ DirectX 10 game ေတြ ကိုလည္း ေကာင္းေကာင္း ကစားလို႔ ရပါတယ္။ Microsoft Visual Studio 2008 ကို ထည့္ၿပီး အလုပ္လုပ္ တာလည္း အားလံုး အဆင္ေျပတယ္ လုိ႔ ဆိုပါတယ္။
ခ်စ္စရာလည္းေကာင္း၊ လွလည္းလွတဲ့ MacBook အျဖဴေလးေတြကို 1500 S$ ေလာက္နဲ႔ ၀ယ္လို႔ရပါတယ္။ (Core2Duo 2.0, 2GB RAM, 160GB HD) နဲ႔ပါ။ 4GB RAM နဲ႔ 320GB hard disk နဲ႔ ဆိုရင္ 2000 နီးပါးေလာက္ေတာ့ ရိွပါတယ္။ ကၽြန္ေတာ့ အေနနဲ႔ ဆိုရင္ေတာ့ Mac OS X မွာလည္း program ေတြ ေရးခ်င္တယ္၊ Windows နဲ႔လည္း အလုပ္လုပ္ခ်င္တယ္ ဆိုေတာ့ MacBook ေလး၀ယ္ၿပီး dual boot လုပ္တာ စိတ္၀င္စားမိပါတယ္။ MacBook PRO ေတြရဲ႕ touch pad က multi-touch လည္း ရပါတယ္။ Windows 7 နဲ႔ ပိုအဆင္ေျပတာ ေပါ့ေနာ္။

ဘယ္လိုပဲ ျဖစ္ျဖစ္ style က်က်၊ အဆင့္ျမင့္ျမင့္ ဟန္ေလးပန္ေလးနဲ႔ MacBook ေလးကို လည္း ကိုင္ခ်င္တယ္။ Windows Vista သံုးမွလည္း ျဖစ္မယ္ ဆုိတဲ့သူေတြ အတြက္ အခုေတာ့ အရမ္းကို ၀မ္းသာ စရာ အဆင္ေျပ သြားတာေပါ့ေနာ္။ ၿပီးေတာ့ Mac OS X ကို တစ္ျခား PC မွာ ထည့္တာက illegal ျဖစ္ေပမယ့္၊ MacBook ထဲကို Windows installer DVD ကို တရား၀င္ ၀ယ္ၿပီး Windows ထည့္သံုးတာက တရား၀င္တယ္ လို႔ ေျပာလို႔ရပါတယ္။ ဒါေၾကာင့္ ပို အဆင္ေျပတာေပါ့ေနာ္။

Style က်က် MacBook ျဖဴျဖဴ ေလးေတြကို ေက်ာ့ေက်ာ့ေလး ကိုင္ၿပီး Windows XP/Vista နဲ႔ Windows7 ေတြ မသံုးခ်င္ဘူးလား……..။

ref: http://thiha-ucsm.blogspot.com/2009/08/cute-macbooks-for-windows-users.html
Saw Linux  /  5:43 PM  /    /  No comments
Mac OS မွာ Myanmar3 font ထည့္သြင္းနည္းျဖစ္ပါတယ္။ လိုအပ္သူမ်ားအတြက္အဆင္ေအာင္ဆိုျပီး MM IT Pro ကေန ယူးထားတာပါ။ ေအာက္ပါ font နဲ႔ keyboard အရင္ေဒါင္းထားလိုက္ပါ။

1. Font Download
Click Here
2. Keyboard Download
Click Here

Font installation
1. "Font Book" application ကိုဖြင့္ပါ။ ပြင့္လာရင္ ပင္နယံစက္သြားပံုကို နိွပ္ပါ ( ေပၚေနတဲ့ ပံုစံက OS version တစ္ခုနဲ့ တစ္ခု တူခ်င္မွတူမွာပါ )
2. "Add Font" နိွပ္ျပီးရင္ download ခ်ထားတဲ့ font ကိုေရြးေပးေပါ့။

Keyboard installation
1. Keymagic Keyboard ကို ရယူျပီးရင္ ၂-ခ်က္နိွပ္ျပီး ဆက္လုပ္( install) သြားပါ။ ျပီးသြားရင္
2. Key လက္ကြက္ေတြရိွတဲ့ေနရာမွာ(နိုင္ငံအလံ ရိွတဲ့ ေနရာ) နိွပ္လိုက္ပါ။ ပြင့္လာရင္ Keymagic ကိုေရြးေပးရင္ရျပီ။
3. စာရိုက္ေတာ့မယ္ဆိုရင္ အလံရိွတဲ့ လက္ကြက္ေနရာမွာ Keymagic ကိုေရြး ရမယ္။ Keymagic က လက္ကြက္ ၃-၄ မို်းေလာက္ ထည့္ေပးထားမွာပါ။

ဒါဆိုရင္ ကိုနဲ့အကြ်မ္းတဝင္ ရိွမဲ့ လက္ကြက္ကို ဆက္ေရြးျပီး စာရိုက္လို့ရပါျပီ။ မွတ္ခ်က္။ က်ေနာ့္စက္က version 10.4 နိွမ့္ေနလို့ Keymagic ထည့္လို့မရဘူး။ သူမ်ားစက္ကို တခါထည့္ဘူးတယ္။ မွတ္မိသလို ေရးထားတာ။ ေသခ်ာတာက Keymagic ေရြးျပီး လက္ကြက္ပါေရြးရတယ္။

 ေအာက္ကပံုေတြကို ျကည့္လိုက္ရင္ ျမင္သာ မွာပါ။ က်ေနာ္ကိုယ္တိုင္ လုပ္ထားတဲ့ myanmar3 လက္ကြက္လဲရိွတယ္။ install လုပ္စရာမလိုဘူး ဖိုင္တစ္ခုပါပဲ။ သူ့ေနရာမွာ သြားခ်ထားလိုက္ရံုပဲ။ ဒါေပမယ့္ သေဝထိုး ကိုေတာ့ ဗ်ည္း တို့ ၀် ျ၀ ၀ြ ၀ွ တို့ေနာက္မွ ရိုက္ရတယ္။


Ref : http://www.myanmaritpro.com/profiles/blogs/mac-os-font

Monday, October 1, 2012

Saw Linux  /  7:07 PM  /    /  No comments
Mac OS အသံုးျပဳသူမ်ားအတြက္ Zawgyi font သြင္းနည္းကို WaiPhyoK ေရးတဲ့ပုိ႔စ္နဲ႔ပဲ တင္ေပးလိုက္
တယ္။ တစ္ခ်ိဳ႕က ပိုက္ပိုက္တတ္ႏိုင္ေတာ့ ipone, ipad, Mac Book ကို ၀ယ္သံုးလိုက္တယ္။ ဒါေပမယ့္
သူ႔ရဲ႕ application software ေတြ ဘယ္လိုအသံုးျပဳရမလဲ ဆိုတာဘာမွမသိလိုက္ဘူး။ အဲဒါမ်ိဳးက်ေတာ့
အေတာ္ကိုအဆင္မေျပတာပဲ။ အထူးအားျဖင့္ ျမန္မာေဖါင့္ပဲ။ ျမန္မာေဖါင့္က အခုထိ နည္းပညာပိုင္းမွာ
starndup မျဖစ္ေလေတာ့ ဘယ္ OS ပဲထြက္လာထြက္လာ လြယ္လြယ္နဲ႔အသံုးျပဳလို႔မရပါဘူး။

အဲဒါဆိုေတာ့ window os မွာ ျမန္မာေဖါင့္အလြယ္တကူထည့္သြင္းႏိုင္ေပမယ့္ က်န္တဲ့ OS မ်ားအ
တြက္ အနည္းငယ္ခက္ခဲႏိုင္ပါတယ္။ မသိရင္ေပါ့ေနာ္။ ကဲ..Mac OS မွာ zawgyi font ထည့္သြင္းလို
ေသာသူမ်ားအတြက္ ေအာက္ပါ WaiPhyoK ေရးထားတဲ့ တ်ဴတိုရီယ္နဲ႔ ဖတ္ျပီးလုပ္ၾကည့္ပါ။

zawgyi logo


Zawgyi Keyboard for Mac OS X ရပါျပီ။ ကြ်န္ေတာ္ အခ်ိန္အေတာ္ေလး ေနာက္က်ေနခဲ့တာကိုု နားလည္ေစာင့္ဆိုုင္းေပးခဲ့ၾကတဲ့ သူငယ္ခ်င္းေတြကိုု အထူးပဲ ေက်းဇူးတင္ရွိပါေၾကာင္း ဦးစြာ ပထမ ေျပာၾကားလိုုပါတယ္။ ကြ်န္ေတာ္ စမ္းသပ္သမ်ွ အ၀၀ကိုု ကူညီေပးခဲ့ၾကတဲ့ သူငယ္ခ်င္းေတြလည္း နားျငီးလိုု႔ေနပါျပီ။ ဒီဗားရွင္းကိုုေတာ့ Beta Version လိုု႔ ပဲ သတ္မွတ္ၾကေစလိုုပါတယ္။ အမွားပါက ခြင့္လႊတ္ရန္ စကားခ်ီးခံထားပါေၾကာင္း။

ေဇာ္ဂ်ီ လက္ကြက္ - Mac OS X Installation Manual


ကြ်န္ေတာ့္ ကီးဘုုတ္/လက္ကြက္ သြင္းဖိုု႔အတြက္ ပံုုစံ ႏွစ္မ်ိဳးလုုပ္ထားပါတယ္။ Installation Package (.mpkg) ဖိုုင္ ၁မ်ိဳး ႏွင့္ DMG (disk image) ဖိုုင္ ၁မ်ိဳးဆိုုျပီး ရွိပါတယ္။

သတိျပဳရန္ အခ်က္မ်ား

၁။ ဗာဟီရ မမ်ားခ်င္တဲ့၊ သက္ေတာင့္သက္သာ သြင္းခ်င္တဲ့၊ လူမ်ားက .mpkg ကိုု သြင္းသင့္ပါတယ္။ သတိျပဳရန္မွာ Mac OS X 10.4 ႏွင့္ အထက္လူမ်ားသာ အဲ့ဒီ mpkg version ကိုု သံုုးလိုု႔ရပါမယ္။ တျခား OS X ဗားရွင္း သမားမ်ားကေတာ့ ေအာက္က အခ်က္ကိုု ဖတ္ပါ။

၂။ ကြ်န္ေတာ့္ installation package ကိုု မယံုုေသာ၊ security paranoid မ်ား အျပင္ ဘယ္ Mac Users မဆိုု .DMG Version ကိုု သံုုးႏိုုင္ပါတယ္။

၃။ ဘယ္ဗားရွင္း မဆိုု သြင္းတဲ့ အခါ၊ Admin Access လိုုပါတယ္။ ျပီးရင္ Log-out တခါလုုပ္ျပီး Log-in ျပန္၀င္ရပါမယ္။

၄။ ဖြင့္ထားေသာ Application မ်ားကိုု ၾကိဳတင္ ပိတ္ထားလ်ွင္ အေကာင္းဆံုုး ျဖစ္မွာပါ။

၅။ လက္ကြက္သည္ ၀င္းဒိုုးဗားရွင္းႏွင့္တူတူပဲျဖစ္ပါတယ္။ ပါတ္ဆင့္မ်ားကိုု Ctrl + Alt အစား Alt ၁ခုုထဲသံုုးပါ။ Ctrl + Alt + Shift အစား Alt + Shift သာ သံုုးပါ။


စဥ္းစားျပီးသြားရင္ ေအာက္မွာ ျပထားတဲ့ iCon ၂ ခုုထဲက ၾကိဳက္တဲ့ ဗားရွင္းကိုု အရင္ ေဒါင္းလုုပ္လုုပ္ၾကပါ။ Primary Source ႏွင့္ အတူ Mirror ၂ခုုစီလည္း တင္ထားေပးပါတယ္။


Package Version


DMG Version


Package (.mpkg) Users မ်ား လုုပ္ေဆာင္ရန္

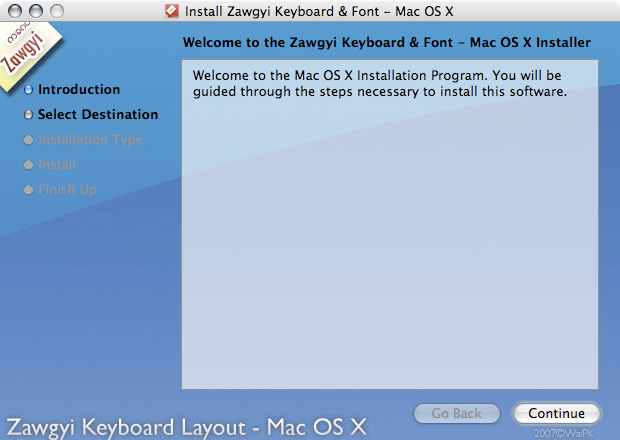
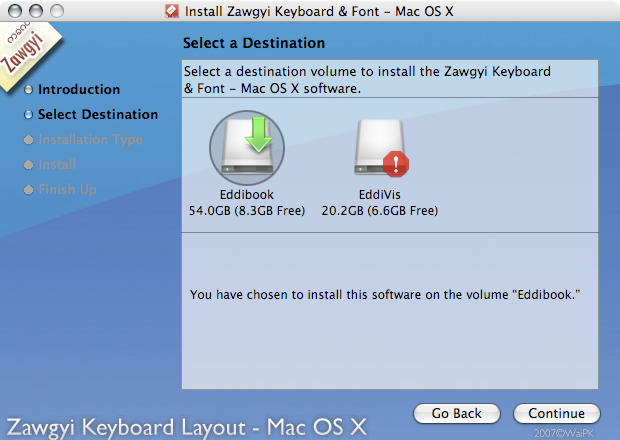
Package ကိုု သြင္းတဲ့လူေတြအေနႏွင့္ ေဒါင္းလုုပ္လုုပ္ထားတဲ့ ဇစ္ဖိုုင္ကိုု ျဖန္႔ခ်လိုုက္ပါ။ .mpkg ႏွင့္ ဆံုုးတဲ့ ဖိုုင္ေလး ၁ခုု ထြက္လာပါလိမ့္မယ္။ Double click ႏွိပ္ျပီး ဖြင့္လိုုက္ရင္ ေအာက္မွာျပထားတဲ့ ပံုုႏွင့္ ဆင္တူတဲ့ Wizard ေလး ၁ခုုေပၚလာပါမယ္။ အဆင့္ဆင့္ကိုု Next , OK ႏွင့္ ေရြးလိုုက္ယံုုပါပဲ။ Admin access ကိုု Authenticate လုုပ္ခိုုင္းရင္ သင့္ရဲ႕ Password ထည့္ျပီး ဆက္သြားပါ။ ေနာက္ဆံုုး Finish လုုပ္ျပီးရင္ Log Out လုုပ္ဖိုု႔ ေျပာပါမယ္။ Log Out လုုပ္၊ ျပန္၀င္ျပီးရင္ ေအာက္က Final Flow ကိုု ဆက္ဖတ္ပါ။


zgInstallpkgsmall1

zgInstallpkgsmall2

Disk Image (.dmg) Users မ်ား လုုပ္ေဆာင္ရန္

.dmg ဖိုုင္ကိုု အရင္ ေဒါင္းလုုပ္လုုပ္ျပီးရင္ double-click ႏွိပ္ျပီး ဖြင့္လိုုက္ပါ။ ေအာက္မွာျပထားတဲ့ ပံုုႏွင့္ ဆင္တူတဲ့ ၀င္းဒိုုး ၁ခုု တက္လာပါမယ္။ သက္ဆိုုင္ရာ ဖိုုလ္ဒါေတြထဲ မွ်ားျပထားတဲ့အတိုုင္း Drag & Drop ဆြဲထည့္လိုုက္ပါ။ Admin Access Password ေတာင္းရင္ သင့္ Password ထည့္ေပးလိုုက္ပါ။ ေနာက္ျပီးရင္ Log Out လုုပ္ပါ။ ျပီးရင္ Log In ျပန္၀င္ျပီး ေအာက္က Final Flow ကိုု ဆက္ဖတ္ပါ။


dmgInstallSmall


Final Flow - Final Steps for All Users

အခုုလိုု Log In ျပန္၀င္လာျပီးသြားရင္ ကီးဘုုတ္ေလးေအာက္ႏွင့္ ဖြန္႔က စက္ထဲကိုု ၀င္သြားပါျပီ။ ဒါေပမယ့္ ကြ်န္ေတာ္တိုု႔၀င္းဒိုုးစ္မွာ သံုုးသလိုု Language Bar ေလးကေနေျပာင္းေပးတာမ်ိဳး၊ Short Keys ေလး ေတြ ႏိွပ္လိုုက္တာႏွင့္ ျမန္မာ ကေန အဂၤလိပ္ ေျပာင္း သြားတာမ်ိဳးေတြလုုပ္ရပါဦးမယ္။ ေအာက္က အဆင့္ေတြကိုု ဆက္သြားေပးပါ။

၁။ ပထမ International Preferences ( System Preferences ေအာက္က International ပါ။ ) ကိုု ဖြင့္ပါမယ္။ သြားရခက္တယ္ထင္တဲ့လူေတြက ဘာမွ ေထြေထြထူးထူးလုုပ္မေနပဲ ေအာက္က Screenshot မွာ ျပထားသလိုု သင္တိုု႔ OS X Screen ရဲ႕ ညာဘက္အေပၚေထာင့္က Spotlight ကိုု သာ သံုုးလိုုက္ပါ။ မွန္ဘီလူး ပံုုေလးကိုု တစ္ခ်က္ႏွိပ္ျပီး၊ International လိုု႔ ရိုုက္ျပီး၊ ခဏေစာင့္ပါ။ ေပၚလာရင္ ကလစ္ႏွိပ္လိုုက္ပါ။


international1

international2


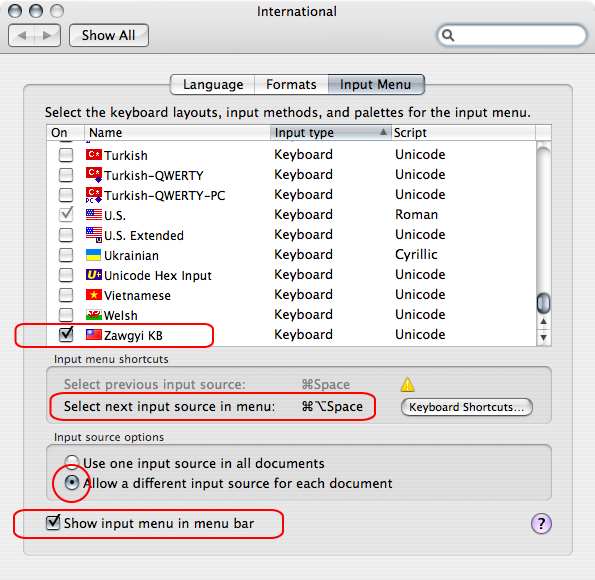
၂။ International Preferences တက္လာပါမယ္။ Languages ၊ Formats ၊ Input Menu ဆိုုျပီး Tab သံုုးမ်ိဳးေတြ႔ပါမယ္။ Input Menu ကိုု ကလစ္လိုုက္ပါ။ ျပီးရင္ ဒုုတိယ Screenshot မွာ ျပထားတဲ့ အတိုုင္း Input Menu List ၾကီးေတြ႔ပါလိမ့္မယ္။ ပံုုထဲကအတိုုင္း Zawgyi KB ကိုု ရွာျပီး အမွန္ျခစ္ေလးျခစ္လုုိက္ပါ။ Show Input Menu in Menu Bar ကိုုလည္း အမွန္ျခစ္ျခစ္ပါ။ ေနာက္ Allow a different input source for each document လည္း ေရြးထားလိုုက္ပါ။


InputMenu1

InputMenu2


၃။ အဲ့ဒီအေပၚက Screenshot မွာ Select Next Input Source in Menu ဆိုုျပီး ကီးဘုုတ္ shortcuts ႏွင့္ ပတ္သက္တဲ့ အပိုုင္းကိုု ကြ်န္ေတာ္ အနီေရာင္ ၀ိုုင္းထားတာေတြ႔ရပါမယ္။ အဲ့ဒါ ကီးဘုုတ္ ခလုုတ္တြဲ ၁ခုု ႏွိပ္တိုုင္း Input Language ေျပာင္းဖိုု႔ပါ။ တခ်ိဳ႕ ယူဆာေတြ က အဲ့ဒီေနရာမွာ Conflict ရွိတယ္လိုု႔ ေျပာၾကပါတယ္။ Conflict ရွိေနရင္ အ၀ါေရာင္ exclamation mark ေလး ၁ခုုေတြ႔ ပါလိမ့္မယ္။ Select Previous Input Source ရဲ႕ default key shortcut က Apple Key + Space ပါ။ Select Next Input Source ရဲဲ႕ default shortcut က Apple Key + Alt Key + Space ပါ။ မ်ားေသာအားျဖင့္ Select Previous Input Source ေဘးမွာ Conflict icon ေလး ေပၚေနပါလိမ့္မယ္။ အဲ့ဒါဘာလိုု႔လဲဆိုုေတာ့ Spotlight ကိုုေခၚတဲ့ shortcut ႏွင့္ သြားရႈပ္ေနလိုု႔ပါ။ အဲ့ဒီအခ်က္ကိုုျပင္ဖိုု႔ Keyboard Shortcuts ဆိုုတဲ့ Button ၾကီးကိုု ႏွိပ္လိုုက္ပါ။


၄။ Keyboard & Mouse Preferences Pane ေပၚလာပါလိမ့္မယ္။ Keyboard Shortcuts Tab ကိုု ႏွိပ္ပါ။ ေအာက္က Screenshot ကိုု တခ်က္ၾကည့္ေပးပါ။ ပံုုမွာ ျပထားတဲ့အတိုုင္း Input Menu ကိုု ေတြ႔ေအာင္ရွာပါ။ ကြ်န္ေတာ္ကေတာ့ Select Next Input Source ၁ခုုထဲကိုု ေရြးထားပါတယ္။ အဲ့ဒါပိုုေကာင္းပါတယ္၊ စမ္းသံုုးၾကည့္ပါ။ ကီး ခ်ိန္းခ်င္ရင္ အဲ့ဒီ ကီးေပၚမွာ Double Click ႏွိပ္ျပီး ၾကိဳက္တဲ့ ကီးတြဲကိုု ႏွိပ္ထည့္ပါ။ ေနာက္ ခုုနက ျပႆနာတက္ေနတဲ့ Spotlight ကုိလည္းေတြ႔ပါလိမ့္မယ္။ သူ႔ shortcut ကိုု သူ႔ default ျဖစ္တဲ့ Apple Key + Space ပဲ ထားတာေကာင္းပါတယ္။ ၿပီးရင္ Keyboard Pref ကိုု ထြက္လိုုက္လိုု႔ရပါျပီ။


KeyboardShortcuts


၅။ အားလံုုးျပီးပါျပီ။ သင့္ရဲ႕ Menu Bar မွာ အေမရိကန္ အလံေလး ေပၚလာပါလိမ့္မယ္။ သူ႔ကိုုႏွိပ္လိုုက္ရင္ List ေလးက်လာျပီး ျမန္မာအလံကိုုေရြးျပီး ျမန္မာလိုုစရိုုက္လိုု႔ရပါျပီ။ ကီးဘုုတ္ shortcut ကိုုလည္း စမ္းၾကည့္ပါဦး။


ChangeInputSource


Notes:
- Installation Environment Tested and Demoed was on Mac OS X 10.4 Tiger.
- Offline PDF version of this manual will be online tomorrow.

Future Fixes:
- Admin Access မလိုုဘဲ သြင္းလိုု႔ရေအာင္ ျပင္ေရးေပးပါ့မယ္။
- Zawgyi Font ေနာက္ဆံုုးဗားရွင္း ဟုုတ္မဟုုတ္ကြ်န္ေတာ္လည္း မေသခ်ာပါဘူး။ အသစ္ထြက္မယ္ဆိုုထားတဲ့ ဗားရွင္းထြက္တာႏွင့္ ျပန္တင္ေပးပါ့မယ္။
- Automation Workflow ၁ရပ္အေနႏွင့္ အဆင့္ေတြအမ်ားၾကီးသက္သာသြားေအာင္ ကြ်န္ေတာ္ ၾကိဳးစားၾကည့္ပါမယ္။

Last words:
- ေက်းဇူးတင္ထိုုက္သူ အားလံုုးကိုု ထပ္မံ ေက်းဇူးအထူးတင္ပါေၾကာင္းႏွင့္ သံုုးတဲ့လူအားလံုုး အိုုေကႏိုုင္မယ္လိုု႔ ေမ်ွာ္လင့္ပါတယ္ဗ်ာ။ အခ်ိန္မေရြး ကြ်န္ေတာ့္ အီးေမးလ္ကိုု ပိုု႔ျပီး ဆက္သြယ္ ဆဲဆိုု၊ ၾကိမ္းေမာင္းႏိုုင္ပါတယ္။ ခုုေတာ့ မနက္ ငါးနာရီထိုုးေတာ့မယ္။ အိပ္ေတာ့မယ္ဗ်ိဳး။ ....


ေလးစားစြာျဖင့္
WaiPhyoK


ေနာက္ျပီး ပိုျပီးျပည့္စံုေအာင္ ၀င္းကမၻာေက်ာ္ဆိုက္မွာ ေရးထားတဲ့နည္းေလးကိုပါ ထပ္မံျဖည့္ေပးလိုက္
တယ္။ ေလ့လာၾကည့္ပါ။

Mac ကြန္ျပဴတာမွာ Zawgyi font အသံုးျပဳနည္း

 Here is the instruction Video for how to download and install Zawgyi Font (Burmese) in a MAC OSX (Apple Computer). Keyboard layout is the same with Windows, but do research yourself when you are trying to use (Alt) key in OSX (press and hold “Option”key down) instead of (Atl+Tide) key in Windows. ထပ္ဆင့္စာလံုုးေတြရိုုက္ခ်င္ရင္ “Option” key ကိုု ဖိထားရင္းရိုုက္ရပါတယ္။

Mac ကြန္ျပဴတာအတြက္ Zawgyi font ကို ေအာက္က DOWNLOAD Link ကေန Click ျပီးေဒါင္းယူပါ..။

Download This

 1 . Install လုပ္လိုက္ပါ
2 . Install လုပ္ၿပီးသြားရင္ Mac က Log Out ဆိုၿပီးေတာင္းလိမ့္မယ္ ။ ေပးလိုက္ပါ ။
3 . Mac ျပန္တက္လာရင္ Settings ထဲကိုသြားပါ
4 . Language & Text ကိုသြားၿပီး Input Source ေနရမွာ ျမန္မာ အလံေလးနဲ႔ Zawgyi Myanmar ဆိုတာေလးလိုက္ရွာၿပီး Check လုပ္ေပးလိုက္ပါ

ဒါေပမဲ႔ က်ေနာ္ေတာ့ Mac ကြန္ျပဴတာ မသံုးႏိုင္ပါဘူး ဆိုေတာ့ Zawgyi font ကို Mac မွာ ဘယ္လို install လုပ္ရမယ္ဆိုတာ နားမလည္ပါဘူး ....:D

Search