


ဘေလာ့အတြက္ေရးလက္စနဲ႔ ေနာက္တစ္မ်ိဳးေရးလိုက္အုန္းမယ္။ ဘေလာ့လွလွေလးဖန္တီးခ်င္ရင္ေတာ့ ဒါေတြလိုအပ္တယ္ေလ။
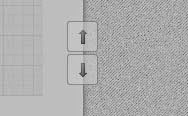
တစ္ခ်ိဳ႕ဘေလာ့ေတြမွာေတြ႕ဖူးၾကပါလိမ့္မယ္။ အဲဒီေဘာတြန္ကိုႏွိပ္လိုက္တာနဲ႔ ဘေလာ့မ်က္ႏွာျပင္ အထက္၊ ေအာက္ေရြ႕လွ်ား
သြားတာမ်ိဳးေပါ့ဗ်ာ။ အဲလိုမ်ိဳးလုပ္ခ်င္တယ္ဆိုရင္ လုပ္နည္းေလးေပါ့။ ကဲ...စမ္းၾကည့္ရေအာင္...
၁။ ဘေလာ့ဂါ Dashboard ကို၀င္ျပီး Template> Edit HTML ကိုသြားလိုက္ပါ။
၂။ ေအာက္ပါ ကုဒ္ကိုရွာပါ။ အဲဒီကုဒ္ရွာဖို႔ ကီးဘုတ္ေပၚက Ctrl + F ကိုအသံုးျပဳပါ။
၃။ အထက္ပါကုဒ္ကိုေတြ႕လွ်င္ ေအာက္မွာေပးထားတဲ့ ကုဒ္မ်ားကို ၎
၄။ ထိုေနာက္ ကီးဘုတ္ေပၚက Ctrl + F ကိုအသံုးျပဳျပီး
၅။ အားလံုးျပီးလွ်င္ Save Template ကိုႏွိပ္ပါ။
Ref: http://helplogger.blogspot.com/2013/03/how-to-add-go-to-top-and-go-to-bottom.html
ေစာလင္းနက္စ္
တစ္ခ်ိဳ႕ဘေလာ့ေတြမွာေတြ႕ဖူးၾကပါလိမ့္မယ္။ အဲဒီေဘာတြန္ကိုႏွိပ္လိုက္တာနဲ႔ ဘေလာ့မ်က္ႏွာျပင္ အထက္၊ ေအာက္ေရြ႕လွ်ား
သြားတာမ်ိဳးေပါ့ဗ်ာ။ အဲလိုမ်ိဳးလုပ္ခ်င္တယ္ဆိုရင္ လုပ္နည္းေလးေပါ့။ ကဲ...စမ္းၾကည့္ရေအာင္...

၁။ ဘေလာ့ဂါ Dashboard ကို၀င္ျပီး Template> Edit HTML ကိုသြားလိုက္ပါ။
၂။ ေအာက္ပါ ကုဒ္ကိုရွာပါ။ အဲဒီကုဒ္ရွာဖို႔ ကီးဘုတ္ေပၚက Ctrl + F ကိုအသံုးျပဳပါ။
]]></b:skin>၃။ အထက္ပါကုဒ္ကိုေတြ႕လွ်င္ ေအာက္မွာေပးထားတဲ့ ကုဒ္မ်ားကို ၎
]]></b:skin>အထက္မွာထည့္လိုက္ပါ။ /* Up and Down Buttons with jQuery
----------------------------------------------- */
.button_up{
padding:7px; /* Distance between the border and the icon */
background-color:white;
border:1px solid #CCC; /* Border Color */
position:fixed;
background: white url(https://blogger.googleusercontent.com/img/b/R29vZ2xl/AVvXsEiWG-rpMhWUXlHX1FNAS6evd5R9P_-HbE5Y9O7rzBoh2UE5eOzJO__O_LXkGPcz3N-Doi7TVOE-jhlmwPNI2q9v5qk0ZspEvMvMZmoIi5ETgHaJrRj1c1BxSESLyiRFvSy5XpNZhCucGaE/s16/arrow_up.png) no-repeat top left;
background-position:50% 50%;
width:20px; /* Button's width */
height:20px; /* Button's height */
bottom:280px; /* Distance from the bottom */
right:5px; /* Change right to left if you want the buttons on the left */
white-space:nowrap;
cursor: pointer;
border-radius: 3px 3px 3px 3px;
opacity:0.7;
filter:progid:DXImageTransform.Microsoft.Alpha(opacity=70);
}
.button_down{
padding:7px; /* Distance between the border and the icon */
background-color:white;
border:1px solid #CCC; /* Border Color */
position:fixed;
background: white url(https://blogger.googleusercontent.com/img/b/R29vZ2xl/AVvXsEjut2uwxQHDk1CtYBz40Sqiuuwq91OeDvRBwmFS3rCItl5Y1832mROyg7m7RQuWIl8nOFzMjFxGipGiwpvzYciw6-V9rnpAKFfXd3d46-8bgqolUt9uXpjzJdSSqtMgczs55vuMstkVc_w/s16/arrow_down.png) no-repeat top left;
background-position:50% 50%;
width:20px; /* Button's width */
height:20px; /* Button's height */
bottom:242px; /* Distance from the bottom */
right:5px; /* Change right to left if you want the buttons on the left */
white-space:nowrap;
cursor: pointer;
border-radius: 3px 3px 3px 3px;
opacity:0.7;
filter:progid:DXImageTransform.Microsoft.Alpha(opacity=70);
} ၄။ ထိုေနာက္ ကီးဘုတ္ေပၚက Ctrl + F ကိုအသံုးျပဳျပီး
</body> ရွာပါ။ ေတြ႕လွ်င္ ေအာက္ပါကုဒ္မ်ားကို </body> အထက္မွာ ထည့္လိုက္ပါ။<script src='http://ajax.googleapis.com/ajax/libs/jquery/1.7.1/jquery.min.js' type='text/javascript'/>
<div class='button_up' id='button_up' style='display:none;'/>
<div class='button_down' id='button_down' style='display:none;'/>
<script>
//<![CDATA[
(function(){var special=jQuery.event.special,uid1='D'+(+new Date()),uid2='D'+(+new Date()+1);special.scrollstart={setup:function(){var timer,handler=function(evt){var _self=this,_args=arguments;if(timer){clearTimeout(timer)}else{evt.type='scrollstart';jQuery.event.handle.apply(_self,_args)}timer=setTimeout(function(){timer=null},special.scrollstop.latency)};jQuery(this).bind('scroll',handler).data(uid1,handler)},teardown:function(){jQuery(this).unbind('scroll',jQuery(this).data(uid1))}};special.scrollstop={latency:300,setup:function(){var timer,handler=function(evt){var _self=this,_args=arguments;if(timer){clearTimeout(timer)}timer=setTimeout(function(){timer=null;evt.type='scrollstop';jQuery.event.handle.apply(_self,_args)},special.scrollstop.latency)};jQuery(this).bind('scroll',handler).data(uid2,handler)},teardown:function(){jQuery(this).unbind('scroll',jQuery(this).data(uid2))}}})();
$(function() {
var $elem = $('body');
$('#button_up').fadeIn('slow');
$('#button_down').fadeIn('slow');
$(window).bind('scrollstart', function(){
$('#button_up,#button_down').stop().animate({'opacity':'0.2'});
});
$(window).bind('scrollstop', function(){
$('#button_up,#button_down').stop().animate({'opacity':'1'});
});
$('#button_down').click(
function (e) {
$('html, body').animate({scrollTop: $elem.height()}, 800);
} );
$('#button_up').click(
function (e) {
$('html, body').animate({scrollTop: '0px'}, 800);
} );});
//]]>
</script> ၅။ အားလံုးျပီးလွ်င္ Save Template ကိုႏွိပ္ပါ။
Ref: http://helplogger.blogspot.com/2013/03/how-to-add-go-to-top-and-go-to-bottom.html
ေစာလင္းနက္စ္


0 comments:
Post a Comment