


ကၽြန္ေတာ္တို႔ တစ္ေတြသည္ စာေတြႏွင့္ရွင္းျပသည္ထက္ ပံုကေလးေတြႏွင့္ရွင္းျပသည္ကို ႏွစ္သက္ၾကလိမ့္မယ္လို႔ ထင္ပါတယ္။ဒါေၾကာင့္ ကၽြန္ေတာ္ သူငယ္ခ်င္းတို႔ တစ္ေတြနားလည္ရလြယ္ကူေအာင္ router/access point တစ္ခု တည္ေဆာက္ပံုကို အတတ္ႏိုင္ဆံုးရွင္းလင္းလြယ္ကူမႈရွိေအာင္ ပံုကေလးေတြႏွင့္ရွင္းလင္းျပေပးပါမယ္။ ဤလမ္းညႊန္ ခ်က္ကေလးဟာ Linksys WRT54G ကို အေျခခံထားပါတယ္ခင္မ်ာ။
အဆင့္(၁) Resetting
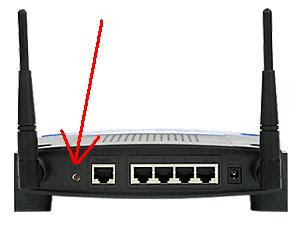
* Connect the power cord
* Unplug ALL Ethernet connections
* Hold down the reset button for at least 15 seconds
အဆင့္(၂) Cable setup

* သင့္ computer ကေနၿပီးေတာ့ (PC or MAC) LAN ports တစ္ခုဆီကို ခ်ိပ္ဆက္ပါမယ္,
* Connect the Internet (WAN) Port to ResNet
DO NOT connect the wall port to any port on the Router yet!
အဆင့္(၃)Accessing Router
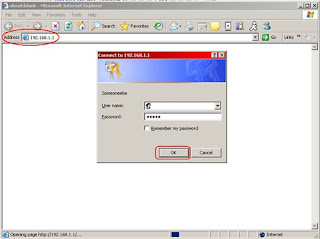
*အင္တာနက္ Explorer ကိုဖြင့္ထားပါမယ္။(ကြန္ပ်ဴတာဟာ Router ႏွင့ခ်ိပ္ဆက္ထားရပါမယ္)
*Address Bar မွာ 192.168.1.1 လို႔ရိုက္ၿပီၚ Enter ေခါက္လိုက္ပါ။
* အမည္ရိုက္ထည့္ပါမယ္။
*Password ကို “admin” လို႔ေပးလိုက္ပါ။
*ၿပီးရင္ ok ေပးလိုက္ပါ။ေအာက္ကပံုအတိုင္းေပၚလာပါမည္။
အဆင့္ (၄) Default Screen
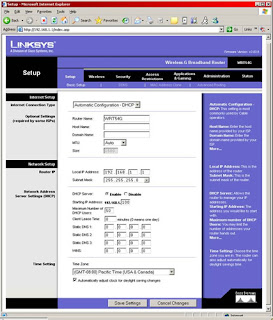
ဆက္သြားပါမယ္။
အဆင့္(၅) Setting a Password
အင့္ရဲ႔ Router ကိုကာကြယ္ႏိုင္ဖို႔ အဆြက္ password ေပးလိုက္ပါ။
ေအာက္ကပံုအတိုင္းျဖစ္ပါတယ္။
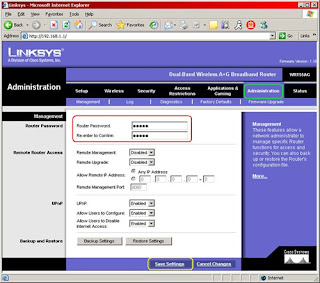
# Click “Administration”
# Enter a desired password into the “Router Password” field
# Click “Save Settings”
ေနာက္တစ္ဆင့္ကို ဆက္သြားပါမည္။
အဆင့္(၆) Configure Wireless SSID
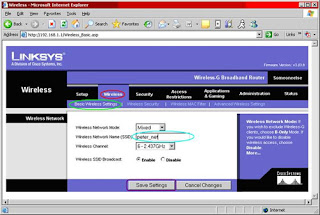
# Click “Wireless”
# Click “Basic Wireless Settings”
# Enter a desired name into the “Wireless Network Name (SSID)” field
# Write down your Wireless Network SSID, it will be used for later.
# Click “Save Settings”
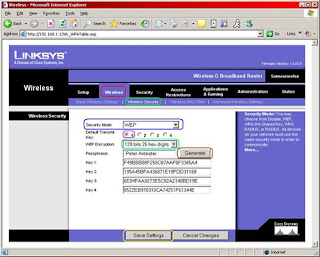
အဆင့္(၇)Configure Wireless WEP or WPA Security Key
အကယ္၍ သင္ဟာ wireless connection မရေသးဘူးဆိုရင္ ေအာင္ပါပံုအတိုင္း သင့္ေရြးခ်ယ္မႈမ်ားကို ျပန္လည္ျပင္ဆင္လုပ္ေဆာင္ႏိုင္ပါတယ္ခင္မ်ာ။

WPA (recommand)အတြက္ဆိုရင္
# Click “Wireless”
# Click “Wireless Security”
# Select “WPA Pre-Shared Key” in the “Security Mode” field
# Set the "WPA algorithm" to "TKIP" ကိိုသြားမယ္။
#WPA shared key ကိုရိုက္ပါမယ္။စာလံုးေပါင္း 8 မွ 32 လံုးၾကားမွာရွိေနရပါမယ္။
#Click “Save Settings”
WEP အတြက္ဆိုရင္
* Click “Wireless”
* Click “Wireless Security”
* Select “WEP” in the “Security Mode” field
* Bubble “1” under the “Default Transmit Key” field
* Select “128 bits 26 hex digits”
* Enter a desired passphrase into the “Passphrase” field
* Click “Generate”
* Carefully write down the code generated in the “Key 1” field on paper, and store it in a safe place. THIS IS YOUR WEP KEY, it will be needed later on.
* Click “Save Settings”
အဲဒီအထဲကမွ သင္ၾကိဳက္ႏွစ္သက္ရာတစ္ခုခုႏွင့္ လုပ္ေဆာင္သြားလို႔ရပါတယ္။ အဆင္ေျပေလာက္မယ္ထင္ပါတယ္။ အကယ္၍ နားမလည္သည့္အပိုင္းမ်ားကို ေမးျမန္းႏိုင္ပါတယ္ခင္မ်ာ။
အဆင့္(၈) Final Cable Setup
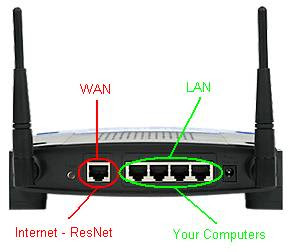
#သင္ါ့ကြန္ပ်ဴတာ (PC or MAC)တစ္ခုကေန LAN port တစ္ခုကေန ခ်ိပ္ဆက္ပါမယ္။
#Connect the wall port to a WAN port on your Router။ေအာက္ပါပံုအတိုင္းခ်ိပ္ဆက္ေပးပါမယ္။

အဆင့္ (၉) Go To Control Panel
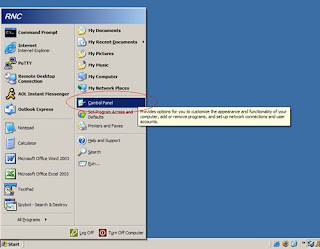
Click start menu>control panel ကိုသြားပါမယ္။
အဆင့္(၁၀)Switch to Classic View

သူကေတာ့ေနာက္တစ္နည္းပါ။
အဆင့္(၁၁)Go to Network Connections
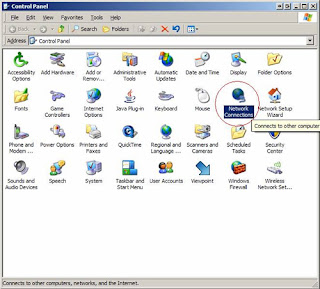
“Network Connections” ကို Double click ႏွိပ္ပါမယ္။ေအာက္ကပံုအတိုင္းေပၚလာပါမယ္။
အဆင့္(၁၂)Network Connections
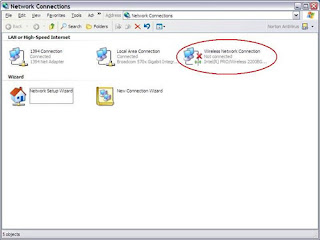
Right click “Wireless Network Connection” and select “Properties”.
အဆင့္(၁၃)Wireless Network Connection Properties
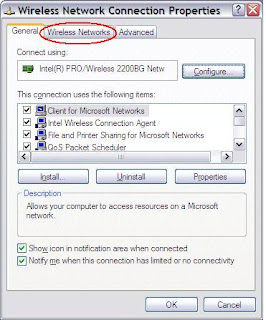
“Wireless Networks” Tab ကိုသြားပါမယ္။
အဆင့္ (၁၄) Adding a Wireless Profile
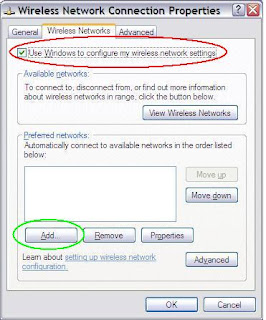
“Use Windows to configure my wireless network settings”ကိုေရြးခ်ယ္လိုက္ပါမယ္။ေနာက္ၿပီး add ကို click ပါမယ္။
အဆင့္(၁၅) Making a Profile
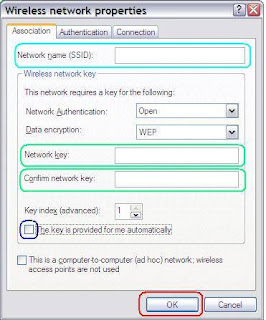
* Network name ကို (SSID) လို႔ရိုက္ပါမယ္။ (ဒီ SSID ပံုစံကို Step 6 မွာေဖာ္ျပထားပါတယ္။).
* “The key is provided for me automatically”မွ အမွန္ခ်က္ကေလးကို ျဖဳတ္လိုက္ပါမယ္။
* Put in the “Key 1” code from Step 7 into “Network key” ႏွင့္ “Confirm network key”.
* “OK”ကို click လို္က္ပါ ဒါဆိုရင္ အားလံုးအဆင္ေျပသြားပါၿပီ။သင္ဟာ wireless တစ္ခုကိုတည္ေဆာက္လို႔ ၿပီးပါၿပီ။
သူ႔ကိုၾကည့္ခ်င္တယ္ဆိုရင္ ေအာက္ပါ command key ကေလးႏွင့္ၾကည့္ႏိုင္ပါတယ္။
> Run> "cmd", clicking "Ok", > typing "ipconfig /all" လို႔ရို္က္လိုက္ရင္ အဆင္ေျပပါၿပီ။ အားလံုးကို ခင္မင္တတ္သူ ေတာသားေလး.
Komy2010 (MyanmarFamily)
အဆင့္(၁) Resetting

* Connect the power cord
* Unplug ALL Ethernet connections
* Hold down the reset button for at least 15 seconds
အဆင့္(၂) Cable setup

* သင့္ computer ကေနၿပီးေတာ့ (PC or MAC) LAN ports တစ္ခုဆီကို ခ်ိပ္ဆက္ပါမယ္,
* Connect the Internet (WAN) Port to ResNet
DO NOT connect the wall port to any port on the Router yet!
အဆင့္(၃)Accessing Router

*အင္တာနက္ Explorer ကိုဖြင့္ထားပါမယ္။(ကြန္ပ်ဴတာဟာ Router ႏွင့ခ်ိပ္ဆက္ထားရပါမယ္)
*Address Bar မွာ 192.168.1.1 လို႔ရိုက္ၿပီၚ Enter ေခါက္လိုက္ပါ။
* အမည္ရိုက္ထည့္ပါမယ္။
*Password ကို “admin” လို႔ေပးလိုက္ပါ။
*ၿပီးရင္ ok ေပးလိုက္ပါ။ေအာက္ကပံုအတိုင္းေပၚလာပါမည္။
အဆင့္ (၄) Default Screen

ဆက္သြားပါမယ္။
အဆင့္(၅) Setting a Password
အင့္ရဲ႔ Router ကိုကာကြယ္ႏိုင္ဖို႔ အဆြက္ password ေပးလိုက္ပါ။
ေအာက္ကပံုအတိုင္းျဖစ္ပါတယ္။

# Click “Administration”
# Enter a desired password into the “Router Password” field
# Click “Save Settings”
ေနာက္တစ္ဆင့္ကို ဆက္သြားပါမည္။
အဆင့္(၆) Configure Wireless SSID

# Click “Wireless”
# Click “Basic Wireless Settings”
# Enter a desired name into the “Wireless Network Name (SSID)” field
# Write down your Wireless Network SSID, it will be used for later.
# Click “Save Settings”
အဆင့္(၇)Configure Wireless WEP or WPA Security Key
အကယ္၍ သင္ဟာ wireless connection မရေသးဘူးဆိုရင္ ေအာင္ပါပံုအတိုင္း သင့္ေရြးခ်ယ္မႈမ်ားကို ျပန္လည္ျပင္ဆင္လုပ္ေဆာင္ႏိုင္ပါတယ္ခင္မ်ာ။


WPA (recommand)အတြက္ဆိုရင္
# Click “Wireless”
# Click “Wireless Security”
# Select “WPA Pre-Shared Key” in the “Security Mode” field
# Set the "WPA algorithm" to "TKIP" ကိိုသြားမယ္။
#WPA shared key ကိုရိုက္ပါမယ္။စာလံုးေပါင္း 8 မွ 32 လံုးၾကားမွာရွိေနရပါမယ္။
#Click “Save Settings”
WEP အတြက္ဆိုရင္
* Click “Wireless”
* Click “Wireless Security”
* Select “WEP” in the “Security Mode” field
* Bubble “1” under the “Default Transmit Key” field
* Select “128 bits 26 hex digits”
* Enter a desired passphrase into the “Passphrase” field
* Click “Generate”
* Carefully write down the code generated in the “Key 1” field on paper, and store it in a safe place. THIS IS YOUR WEP KEY, it will be needed later on.
* Click “Save Settings”
အဲဒီအထဲကမွ သင္ၾကိဳက္ႏွစ္သက္ရာတစ္ခုခုႏွင့္ လုပ္ေဆာင္သြားလို႔ရပါတယ္။ အဆင္ေျပေလာက္မယ္ထင္ပါတယ္။ အကယ္၍ နားမလည္သည့္အပိုင္းမ်ားကို ေမးျမန္းႏိုင္ပါတယ္ခင္မ်ာ။
အဆင့္(၈) Final Cable Setup

#သင္ါ့ကြန္ပ်ဴတာ (PC or MAC)တစ္ခုကေန LAN port တစ္ခုကေန ခ်ိပ္ဆက္ပါမယ္။
#Connect the wall port to a WAN port on your Router။ေအာက္ပါပံုအတိုင္းခ်ိပ္ဆက္ေပးပါမယ္။

အဆင့္ (၉) Go To Control Panel

Click start menu>control panel ကိုသြားပါမယ္။
အဆင့္(၁၀)Switch to Classic View

သူကေတာ့ေနာက္တစ္နည္းပါ။
အဆင့္(၁၁)Go to Network Connections

“Network Connections” ကို Double click ႏွိပ္ပါမယ္။ေအာက္ကပံုအတိုင္းေပၚလာပါမယ္။
အဆင့္(၁၂)Network Connections

Right click “Wireless Network Connection” and select “Properties”.
အဆင့္(၁၃)Wireless Network Connection Properties

“Wireless Networks” Tab ကိုသြားပါမယ္။
အဆင့္ (၁၄) Adding a Wireless Profile

“Use Windows to configure my wireless network settings”ကိုေရြးခ်ယ္လိုက္ပါမယ္။ေနာက္ၿပီး add ကို click ပါမယ္။
အဆင့္(၁၅) Making a Profile

* Network name ကို (SSID) လို႔ရိုက္ပါမယ္။ (ဒီ SSID ပံုစံကို Step 6 မွာေဖာ္ျပထားပါတယ္။).
* “The key is provided for me automatically”မွ အမွန္ခ်က္ကေလးကို ျဖဳတ္လိုက္ပါမယ္။
* Put in the “Key 1” code from Step 7 into “Network key” ႏွင့္ “Confirm network key”.
* “OK”ကို click လို္က္ပါ ဒါဆိုရင္ အားလံုးအဆင္ေျပသြားပါၿပီ။သင္ဟာ wireless တစ္ခုကိုတည္ေဆာက္လို႔ ၿပီးပါၿပီ။
သူ႔ကိုၾကည့္ခ်င္တယ္ဆိုရင္ ေအာက္ပါ command key ကေလးႏွင့္ၾကည့္ႏိုင္ပါတယ္။
> Run> "cmd", clicking "Ok", > typing "ipconfig /all" လို႔ရို္က္လိုက္ရင္ အဆင္ေျပပါၿပီ။ အားလံုးကို ခင္မင္တတ္သူ ေတာသားေလး.
Komy2010 (MyanmarFamily)


0 comments:
Post a Comment